
How to evaluate STM32 microcontrollers and prototype 
Obtain a board 
The STM32Cube ecosystem enables users to quickly evaluate a specific STM32 microcontroller and then start prototyping.
The recommended approach is to first select a Nucleo board or a Discovery kit according to the application requirements. There are two quick ways to select the appropriate Nucleo board:
select the microcontroller, then search for the most suitable Nucleo board that includes the closest microcontroller.
if the STM32 microcontroller is already known, go directly to the Nucleo board selector and use the Part Number filter.
For example, by typing
H5
in the search bar, the selector displays the
Nucleo boards that include a microcontroller from the STM32H5 series.
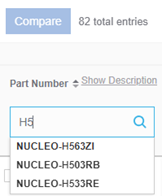
The Nucleo board or Discovery kit are available from several distributors. The availability and price are shown on the Nucleo product page under the Sample & Buy tab. For example, see the NUCLEO-H563ZI board.
Depending on the selected board, a USB mini type B cable, a USB micro type B cable, or a USB Type-C® cable might be required to connect the board to a PC.
Two possible step-by-step procedures are described below to quickly set up the environment and run a blinking LED on a board. Use the Start in the STM32CubeMX tool procedure if the board is listed in this table. Otherwise, use the Start in STM32 Example Library procedure.
Download and install STM32CubeMX tool
STM32CubeMX is a user-friendly configuration and code generation tool for STM32 MCUs. It is available for Windows, macOS, and Linux. It allows the quick generation of a C code project for a board.
Download and install STM32CubeMX on the host PC.
Open STM32CubeMX on the host computer, create a new project from board, and select your Nucleo board.
In the STM32CubeMX options pop-up window, ensure all software components
are selected, and tick
Generate


              demonstration


              code
.
STM32CubeMX allows:
The graphical configuration of the MCU pins
The enabling of peripherals
Managing many more software components in your project
Before carrying out any more configuration, move on to the following step the development flow
Enter the settings of the project in the Project Manager tab like a name for
the project and a project location directory on the host computer; select
STM32CubeIDE
in the
Toolchain / IDE
field.
Click
Generate


              code
.
After the project is generated, open the generated project folder from the pop-up window.
Download and install STM32CubeIDE tool
download and install the free integrated development environment (IDE) from ST.
After installing STM32CubeIDE, open the project by selecting:
File>Open Projects from File System
Then select the folder generated by STM32CubeMX.
Note
If the preferred interface is STM32CubeIDE for Visual Studio Code, generate the CMake format from STM32CubeMX. Then open the project in STM32CubeIDE for Visual Studio Code by selecting:
File>Open Folder
Then launch CMake by clicking on the
CMake
icon in the vertical toolbar and build the project.
Flash and debug
Connect the ST-LINK debugger embedded on the Nucleo board to the PC through USB. Launch a run command from the IDE to flash the binary onto the Nucleo target and start running the software.
Note
A pop-up window may prompt for the update of the firmware version of
the in-circuit ST-LINK debugger/programmer embedded on the Nucleo
board.
Click
Upgrade, keeping the default settings.
After the process is completed, close the window and launch the run command
again.
The software is now running. Press the user button several times to observe the LEDs flashing on and off.
At this stage, the development environment is ready.
Further steps
Enable additional peripherals and configure new GPIOs in the STM32CubeMX tool, then regenerate the code. In this case, recompile the project with STM32CubeIDE. Some middleware, such as USB, file system, or an RTOS such as FreeRTOS™ or ThreadX, can also be configured and added.
Add custom C code to the project by calling STM32Cube hardware abstraction layer (HAL) or low-layer (LL) application programming interfaces (APIs) to access STM32 resources and peripherals. The STM32Cube HAL is an STM32 embedded software layer that maximizes portability across the STM32 portfolio. The LL APIs provide a fast, lightweight, expert-oriented layer that is closer to the hardware than the HAL. If needed, HAL and LL APIs can be used simultaneously, with some restrictions.
Refer to the STM32 Example Library, which contains many basic examples. These well-tested code examples demonstrate how to use the hardware abstraction layer (HAL) or low-layer (LL) application programming interfaces (APIs). Copy and paste code into your project as needed.
Get a basic example from the STM32 Example Library
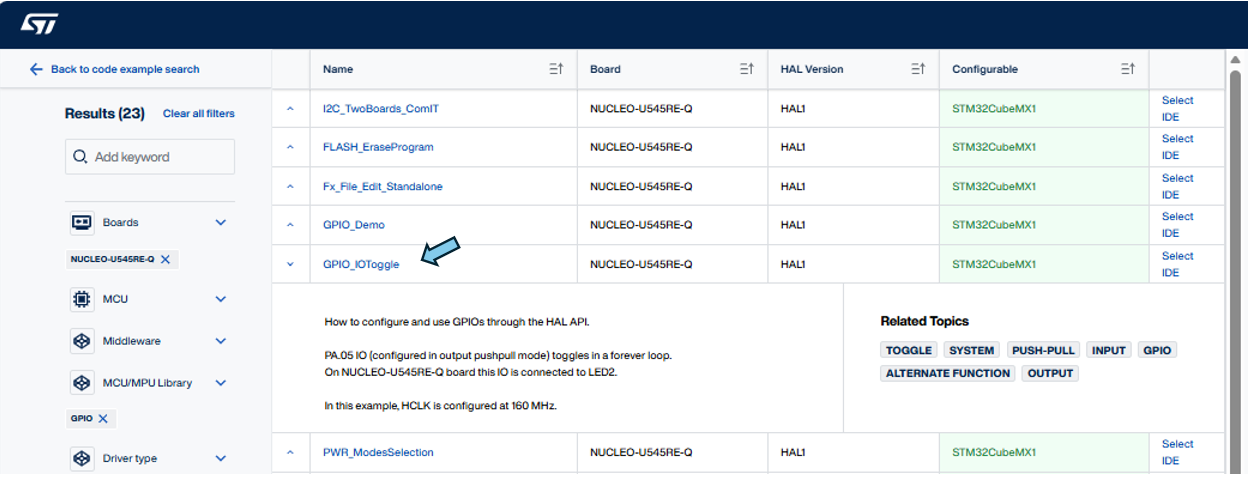
Go to the STM32 Example Library, select the most appropriate example project for your needs and follow the steps below, illustrated here with a GPIO example:
Click
Show filters.In the Board field, select the STM32 board.
In the MCU drivers field, select
GPIO.Click
Find example``button and select a GPIO example, such as ``GPIO_IOToggle, from the list of proposed examples.Check the HAL version column to determine if the HAL version for the required STM32 device is HAL1 or HAL2.
In the right column, select
STM32CubeIDE
for HAL1 or CMake for HAL2 and download the example as
a ZIP file. Extract the example to your disk.
Download and install STM32CubeIDE tool
The project is now ready-to-use. Download and install the free integrated development environment (IDE) from ST.
If the STM32Cube embedded software offer for the required STM32 device is based on HAL1, start with STM32CubeIDE. After installing the tool, launch STM32CubeIDE and open the project by selecting:
File>Open Projects from File SystemThen select the folder of your example. Build the project.
If the STM32Cube embedded software offer is based on HAL2, start with STM32CubeIDE for Visual Studio Code. After installing the tool, launch STM32CubeIDE for Visual Studio Code and open the project by selecting:
File>Open FolderThen launch CMake by clicking on the
CMakeicon in the vertical toolbar and build the project.Note
To work with STM32CubeIDE, import the CMake file from STM32CubeIDE.
Flash and Debug
Connect the ST-LINK debugger embedded on the Nucleo board to the host PC through USB.
Launch the run command from the integrated development environment (IDE) to flash the binary on the Nucleo target and start running the software.
Note
A pop-up window may prompt for the update of the firmware version of
the in-circuit ST-LINK debugger/programmer embedded on the Nucleo board.
Click
Upgrade, keeping the default settings.
After the process is completed, close the window and launch the run command again.
The software is now running; an LED is blinking.
The development environment is now ready.
Further steps
STM32CubeMX is a configuration and code generation tool for STM32 microcontrollers. The tool is available for Windows, macOS, and Linux. It allows users to quickly generate a C code project for a development board.
Download and install the software on the host PC. Depending on the STM32 device, the user is prompted to install either STM32CubeMX for use with HAL1, or STM32CubeMX2 for use with HAL2.
Open the tool on the host PC, create a new project from a board, and select the Nucleo board.
With STM32CubeMX, using the GUI, graphically configure the MCU pins, enable peripherals, or add more software components to the project.
In the STM32CubeMX project manager, type a name for the project, choose
a location in the host PC directory, and select
STM32CubeIDE
as the
toolchain or IDE. If STM32CubeMX2 is used, select
CMake
as the
format in
project settings
.
After clicking on
Generate


              code
in STM32CubeMX, or
Generate


              IDE


              project
in STM32CubeMX2, a project is created on the host disk with
generated source code. This code is a reference to copy and paste into
the first project you started.
Refer to the many available basic examples in the STM32 Example Library. These well-tested code examples demonstrate how to use HAL or LL APIs. They are available as references to copy and paste code into a first project in the IDE.