
 general

How to Validate a Neural Network on STM32 
This tutorial explains how to establish a strong validation strategy for a neural network on STM32 using STM32Cube AI Studio, or the ST Edge AI Core CLI
(via the
ai_runner
Python script) when the GUI is not enough.
Objective 
Verify that a neural network deployed on STM32 preserves numerical accuracy, fits within Flash/RAM budgets, and meets real-time constraints, by running on-target validation and end-to-end pipeline validation.
Validation pipeline 
Prerequisite - Upstream quantization eval: if your model is quantized, its accuracy must already be acceptable in the training framework before importing into Studio.
Step 1 - Analyze & compare on host: does the model fit (Flash / RAM / ops)? Does the generated C-model reproduce the framework model numerically? Both checks can be done, without a board, via STM32Cube AI Studio or the ST Edge AI Core CLI.
Step 2 - Validate on target: does it still hold on the real MCU, with real inference time and actual runtime memory footprint (stack + heap)?
Step 3 - End-to-end application validation: does the full pipeline (preprocess + inference + postprocess) meet your production metric on real data?
Prerequisites 
Tools 
|
Tool |
Purpose |
|---|---|
|
Primary GUI |
|
|
CLI engine |
|
|
Project generation |
|
|
Board flashing |
|
|
Toolchain (or IAR / Keil) |
Studio project setup 
Launch STM32Cube AI Studio.
Project: name + workspace path.
Select Target (board or MCU).
Select Toolchain (IDE / IAR / Keil).
Import your model.
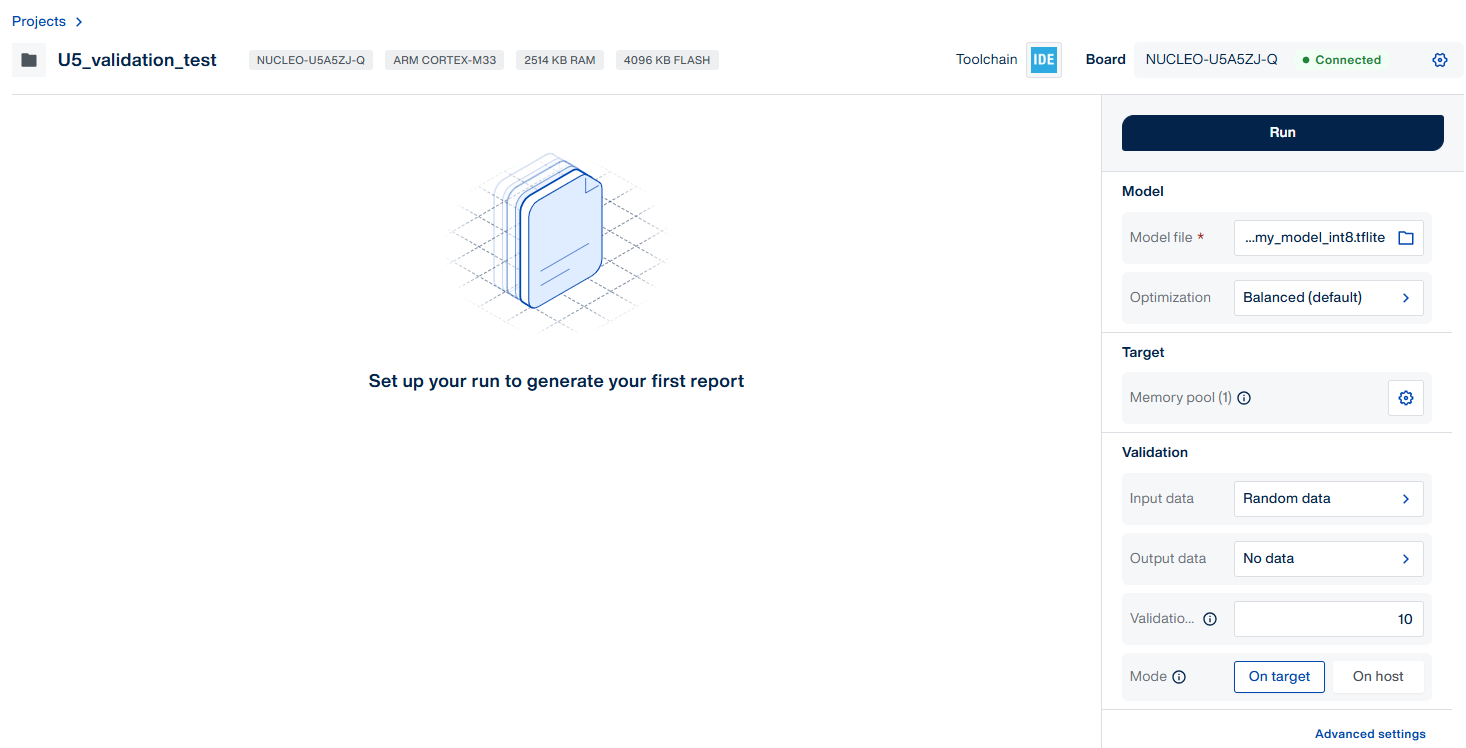
Validate your quantization first 
Studio converts your model. It does not quantize it. If your model is quantized, the quantization happened upstream (TFLite PTQ/QAT, ONNX Runtime).
So:
Quantize in your training framework.
Measure accuracy there, on your validation set, with your production metric, against the original float model.
Confirm the accuracy drop is acceptable before importing into Studio.
If Studio’s on-target validation later disagrees with that upstream accuracy, the divergence is in
conversion. Use Step 1 (host) first, then the
ai_runner
/ CLI deep-dive
in Step 2 to pinpoint the diverging layer.
Validation data 
Without a custom dataset, Studio’s Run (and
stedgeai


             validate
without
-vi) uses
random inputs matched to the model’s input dtype (see
Random data generation):
Float inputs: uniform in
[0.0, 1.0[(configurable with--range).int8inputs: uniform in[-128, 127].uint8inputs: uniform in[0, 255].
Random is a valid first pass. It catches crashes, unsupported ops, and shape mismatches without any data plumbing.
Always prefer a representative dataset.
Reference example 
The commands and snippets throughout this tutorial use generic placeholders
(
<model>.keras,
<validation_dataset>.npz). Substitute your own files.
If you need a ready-made model to try the flow, the
ST MNIST v1
entry of the ST Model Zoo is a small, well-documented example (28x28x1 grayscale input,
36-class output). You will need to prepare your own validation dataset
.npz
with the keys
stedgeai


            validate
and Studio expect:
m_inputs_1-> input batch, shape(N, ...input_shape), preprocessed exactly like training.m_outputs_1-> one-hot reference labels, so ACC is meaningful.
Step 1 - Analyze & compare on host (feasibility + conversion fidelity) 
Before flashing anything, run two checks that need no board and take seconds:
Analyze - reports operator coverage, MACC count, and Flash/RAM footprint. Answers “does this model fit and are all its ops supported?”.
Validate - runs the generated C-model on the PC and compares its outputs to the source-framework model. Isolates conversion bugs from hardware issues.
Must be run with your representative user dataset (same preprocessing as training, one-hot references for classifiers). Random inputs produce meaningless COS / L2r / ACC.
In STM32Cube AI Studio, both checks are performed via the Run command:
Set Mode to On desktop.
Under Validation data, pick Custom dataset and point to your representative samples.
Click Run.
Studio runs analyze + host validation together and displays operator coverage, memory footprint, and numerical metrics in the same report.
Tip
Equivalent CLI:
stedgeai


             analyze


             -m


             <model>


             --target


             <target>
then
stedgeai


             validate


             -m


             <model>


             --target


             <target>


             --mode


             host


             -vi


             <data.npz>
(
host
is the default mode). See the
CLI reference.
Only proceed to Step 2 once both are clean.
Step 2 - Validate on target (on-device validation) 
Run the C model on real STM32 hardware. Checks numerical correctness and measures performance.
What it reveals 
Numerical correctness of the generated C-model.
Inference time on the real CPU.
Runtime memory footprint (stack + heap consumed during inference).
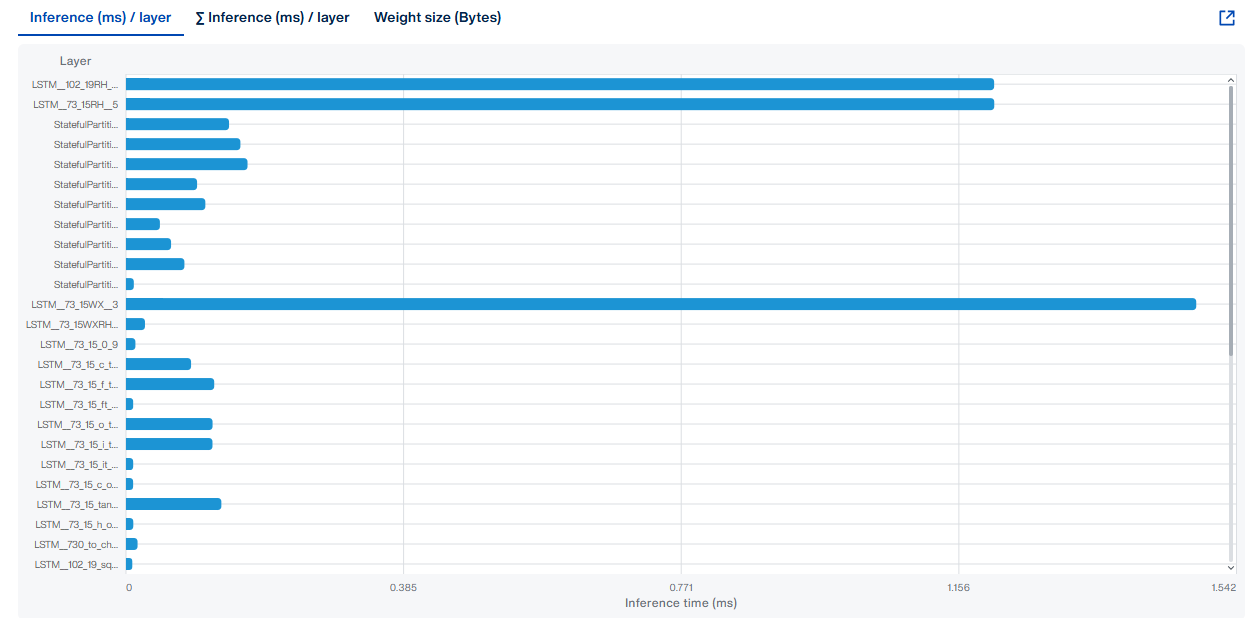
Per-c-node performance breakdown.
Hardware issues: clock, memory placement, cache.
Studio’s Run also fails fast if the model does not fit or uses unsupported ops, but Step 1 (analyze) already gave you that answer without touching hardware.
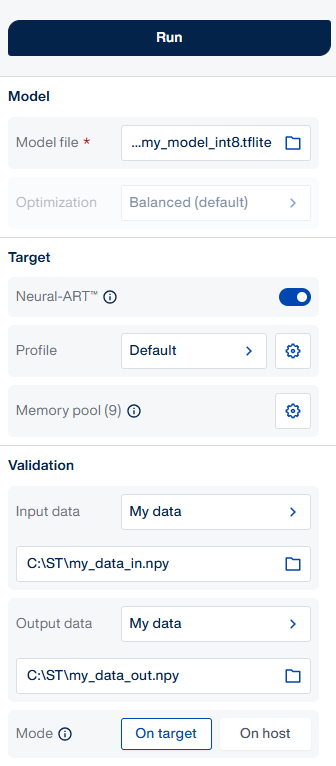
In Studio 
Validation section of the Run dialog:
Mode: On target.
Connect the board over USB.
Validation data: pick Custom dataset.
Click Run.
Studio builds a CubeMX validation project, generates the C-model, compiles, flashes, runs validation, collects results. All four steps happen automatically.
Note
The validation project generated by Studio configures the board’s MCU clock at the maximum frequency achievable with the board’s default power configuration. The metrics you read here are therefore representative of the board’s out-of-the-box peak; your production firmware may report different numbers if it runs the MCU at a lower clock.
Tip
Equivalent CLI chain:
stedgeai


              generate
-> toolchain build -> CubeProgrammer flash ->
stedgeai


              validate


              --mode


              target


              -d


              serial
.
Use real data 
Real, representative data is the only thing that produces meaningful accuracy numbers, especially for quantized models.
Same preprocessing as training.
One-hot reference outputs for classifiers.
Mismatches here cause most “unexpected metric” reports.
What ACC actually measures 
The “reference” ACC compares against depends on whether you provided ground-truth outputs
(
m_outputs_1
in your
.npz):
Without reference outputs, ACC is the agreement between the C-model and the original
framework model (
X-cross
line in the report). This is a conversion fidelity metric, not
a model accuracy metric. A broken model with 10% real accuracy will still report ACC = 100%
here as long as the C-model matches the original.
With reference outputs, the report shows both:
x86


              c-model
and
original


              model
lines
give accuracy against your ground truth (real accuracy), and
X-cross
gives C-model vs
original (fidelity).
Only the ground-truth comparison measures real accuracy. If you skip
m_outputs_1
you are
checking conversion, not accuracy.
Targets:
Float32: L2r < 1e-2, COS >= 0.9999.
Int8: COS >= 0.99, ACC drop within tolerance.
COS <= 0.95: investigate. Use the
ai_runner/ CLI deep-dive below for layer-by-layer L2r and per-output COS.
Performance metrics 
|
Metric |
Meaning |
|---|---|
|
Duration |
ms per sample (mean / min / max / std). |
|
CPU cycles |
Total per inference. |
|
cycles/MACC |
Efficiency (lower is better). |
|
Used stack |
Peak stack depth during
|
|
Used heap |
Normally 0 (runtime does not malloc). |
|
Per-layer |
Duration, %, cycles per c-node. |
Reference cycles/MACC: M4 ~9 (f32) / ~4.5 (int8); M7 ~6 (f32) / ~3 (int8). Higher means slow memory placement or missing cache config.
Going further 
CLI -
stedgeai


              validate


              --mode


              target

Runs against the firmware Studio already flashed.
# Direct run: import + compile + validate on target
stedgeai validate \
    -m <model>.keras \
    --target stm32h7 --mode target \
    -vi <validation_dataset>.npz \
    --batches 200 -d serial:COM6:921600

# Reuse the JSON Studio produced - skips import/compile
stedgeai validate --val-json network_c_info.json --mode target \
    --target stm32h7 -d serial

# Numerical-only pass
stedgeai validate \
    -m <model>.keras \
    --target stm32h7 --mode target \
    -d serial --io-only
Note
The
-vi
file must match the model’s expected input dtype and preprocessing. If you quantized
with
quantization_input_type:


               uint8
, provide raw
uint8
samples; otherwise provide the
already-preprocessed float samples.
|
When |
Option |
|---|---|
|
Many samples |
|
|
Faster numerical-only pass |
|
|
Skip recompile |
|
|
Pin port / baud |
|
ai_runner
(Python)

stm_ai_runner
(also called
ai_runner) is a Python package shipped with ST Edge AI Core.
It exposes a simple
AiRunner
object that lets you send inputs to a deployed C-model, retrieve
predictions, and collect profiling information (directly from your own Python scripts). The same
package is what powers
stedgeai


              validate
under the hood, so you can reuse the exact firmware
Studio already flashed on the board (over serial), or run the C-model on the host as a shared
library.
Use it when you need to extend the fixed CLI workflow with your own dataset loading, metrics, or post-processing:
|
Need |
Why |
|---|---|
|
mAP / IoU / mIoU / WER / top-5 / F1 / PCK |
Not in CLI metric set. |
|
Postprocessing beyond
|
Compare after your postprocessing. |
|
Dataset does not fit a flat file |
Feed your
|
|
Compare vs ground-truth labels or another model |
CLI reference is fixed. |
import numpy as np
from stm_ai_runner import AiRunner

runner = AiRunner()
runner.connect('serial')                       # or 'serial:COM6:921600' to pin the port
runner.summary()

inputs = my_dataloader.next_batch()
outputs, profiler = runner.invoke(inputs, mode=AiRunner.Mode.PER_LAYER)

score = my_metric(my_postprocess(outputs), ground_truth)
runner.disconnect()
AiRunner.Mode:
IO_ONLY,
PER_LAYER,
PER_LAYER_WITH_DATA,
PERF_ONLY.
See the
ai_runner reference
for the full API. Step 3 builds on this.
Layer-by-layer deep-dive (pinpoint a diverging layer) 
When Step 1 (host) or Step 2 (target) shows COS < 0.99, drill down per layer.
Use
ai_runner
in
PER_LAYER_WITH_DATA
mode to capture each c-node’s output tensor.
This works on int8 and float models across Keras, ONNX, and TFLite. Not supported on ISPU,
MLC, or STM32N6 with NPU (use the NPU profiler on N6, see the N6 tutorial).
import numpy as np
from stm_ai_runner import AiRunner

data = np.load("<validation_dataset>.npz")
x = data["m_inputs_1"][:8]

runner = AiRunner()
runner.connect('serial')
c_out, prof = runner.invoke(x, mode=AiRunner.Mode.PER_LAYER_WITH_DATA)

# prof['c_nodes'] is a List[dict]. Per-node keys (see ai_runner doc):
#   'name'  : str                 - c-node name (as shown by runner.summary())
#   'm_id'  : int, optional       - index of the matching source-model layer
#   'data'  : List[np.ndarray]    - one ndarray per output tensor of the node
for node in prof['c_nodes']:
    tensor = node['data'][0]
    print(f"{node['name']:30s}  shape={tensor.shape}  "
          f"mean={tensor.mean():.4f}  std={tensor.std():.4f}")
Cross-referencing a c-node back to a specific source-framework layer is model-dependent
(
stedgeai
may fuse and rename layers). Use
runner.summary()
and the analyze report to
establish the mapping for your model.
Bisecting the model with
--cut-*-tensors

Complementary to per-layer capture: recompile a sub-graph of the source model and validate it in isolation. Effective for bisecting a numerical regression down to a section of the model.
Pass the tensor name (ONNX) or tensor location (TFLite) to
--cut-input-tensors
and
--cut-output-tensors. Both accept a comma-separated list for multi-input/output sub-graphs.
stedgeai validate \
    -m <model>.onnx \
    --target stm32h7 --mode target \
    --cut-input-tensors <input_tensor_name> \
    --cut-output-tensors <output_tensor_name> \
    -vi <validation_dataset>.npz -d serial
Typical workflow: identify a suspect region from the analyze report or
ai_runner
capture,
cut around it, validate the sub-graph, and compare c-model vs original on that region only.
Repeat to converge on the diverging tensor.
Reference: –cut-input-tensors.
Step 3 - End-to-end application validation 
Validate the full pipeline (preprocess + inference + postprocess) on target with real data. Studio
does not automate this step. Use
ai_runner
to drive the validation firmware Studio already
flashed in Step 2.
Pattern 
Swap the model call in your training-time eval script for
runner.invoke(...). Keep everything
else.
Example:
import numpy as np
from stm_ai_runner import AiRunner

data = np.load("<validation_dataset>.npz")
x_val = data["m_inputs_1"]                       # (N, ...input_shape), already preprocessed
y_val = np.argmax(data["m_outputs_1"], axis=-1)  # (N,) class indices

runner = AiRunner()
runner.connect('serial')             # or 'serial:COM6:921600'

correct = 0
for i in range(len(x_val)):
    raw, _ = runner.invoke(x_val[i:i+1])
    pred = np.argmax(raw, axis=-1)
    correct += int(pred == y_val[i])

acc = correct / len(x_val)
print(f"On-target accuracy: {acc:.4f}")
runner.disconnect()
No firmware rebuild needed:
ai_runner
reuses what Studio flashed in Step 2.
What to validate 
Preprocessing matches training pipeline.
Inference correct on real sensor data.
Postprocessing correct (argmax, NMS, thresholding).
End-to-end timing meets the constraints.
Edge cases: boundary, noisy, adversarial inputs.
Summary 
Validating a neural network on STM32 is a three-step funnel where each step catches a different class of defects:
|
Step |
What it checks |
Tool |
Typical failures caught |
|---|---|---|---|
|
1. Analyze & compare on host |
Feasibility (fits, ops supported) + conversion fidelity (C-model vs source model) |
Studio Run / On desktop or
|
Unsupported op, model too big, converter bug |
|
2. Validate on target |
Numerical behaviour on the MCU + inference time + runtime memory footprint |
Studio Run / On device or
|
Kernel bug, cache/clock misconfig, RAM/stack shortage, latency miss |
|
3. End-to-end application validation |
Full pipeline (preprocess + inference + postprocess) against your production metric |
|
Preprocessing mismatch, postprocessing bug, metric regression on real data |
Next steps 
Tune your model’s memory footprint and latency before re-validating.
Set up a CI job using
ai_runnerfor hardware-in-the-loop regression tests.Integrate the validated model into your application firmware.