
 general

Getting Started with ST Edge AI Core 
ST Edge AI Core is a CLI tool that converts a pre-trained AI model into optimized C code for STM32 and other ST targets, and validates it on host or on device.
This tutorial focuses on the STM32N6 microcontroller, embedding the ST Neural-ART™ Accelerator Neural Processing Unit (NPU). It uses the STM32N6570-DK as the reference board.
Objectives 
Analyze a neural network model to check compatibility with the STM32N6570-DK and get memory footprint estimates.
Convert the model (here from
tflite, butonnxandkerasalso supported) to optimized C code for the STM32N6570-DK.Validate the C-model code on the STM32N6570-DK hardware: check memory footprints, model accuracy, and inference time metrics.
Summary 
Install ST Edge AI Core and add it to PATH
Get the example model from the ST Model Zoo
Run
stedgeai analyzeto check model compatibility and memory footprint estimatesRun
stedgeai generateto convert the model to optimized C codeGet the validation firmware, flash the board, and run the firmware
Run
stedgeai validate --mode targetand check the inference metrics
0. Prerequisites 
Component
Minimum version
Purpose
4.0.0
Model code generation and validation
2.19.0
Board flashing
1.2.0
Validation firmware generation
6.17.0
Project configuration and code generation
2.0.0
IDE and compiler
Install and set up ST Edge AI Core
Download the ST Edge AI Core installer from the product page.
Run the installer and select the the following component:
STM32 MCU module- needed for this tutorialThe other modules (
ISPU Module,MLC Module,STELLAR MCU Module) can be installed but are not required for this tutorial.Add the folder containing the
stedgeaiexecutable to your PATH, depending on your OS.STEDGEAI_CORE_DIRrefers to the folder where you installed ST Edge AI Core.# Windows set PATH=%STEDGEAI_CORE_DIR%\Utilities\windows;%PATH% # Linux export PATH=$STEDGEAI_CORE_DIR/Utilities/linux:$PATH # macOS export PATH=$STEDGEAI_CORE_DIR/Utilities/mac:$PATHVerify the installation by running the following command in a new terminal:
stedgeai --version
# Expected: ST Edge AI Core v4.0.0
See Installing stedgeai components and Setting environment for details.
1. Getting the model 
The ST Model Zoo is an open-source repository of pre-trained, STM32-optimized AI models for image classification, object detection, audio classification, and more. Each model comes with training scripts and configuration files.
This tutorial uses the MobileNetV2 α=0.35 — 128×128 INT8, in
.tfliteformat, as an arbitrary example. It is a compact image classification model pre-trained on ImageNet and post-training quantized to INT8 for efficient deployment on AI-accelerated STM32.Download it from the model zoo: mobilenetv2_a035_128_int8.tflite
2. Checking the model 
The
analyzecommand is used to verify that the model is supported by the target hardware, and to get memory footprint and complexity estimates, without writing any output files.This is the recommended first step: it lets you quickly evaluate a model candidate against your target’s memory constraints, and confirms all operators are supported before committing to code generation and on-target validation.
Go to the folder where the model is located and run:
stedgeai analyze -m mobilenetv2_a035_128_int8.tflite --target stm32n6 --st-neural-artCheck the analyze report, in the
./st_ai_output/directory. The report includes:
A breakdown of the model layers with output shapes, number and size of parameters, multiply-accumulate operations (a complexity indicator, referred to as “macc”)
Model compilation details
Memory usage information (weights, activations, total)
A summary of how well the model is mapped to the NPU. The term “epoch” (not to be confused with epochs when training neural networks) here refers to an elementary group of layers executed together, either hardware (“HW”) when mapped to the NPU, or software (“SW”) when falling back to the Cortex-M55. More information is available here.
See Analyze command for the full reference.
3. Generating optimized model code 
The
generatecommand converts the model into C files ready for integration into an STM32 project.
Run
generatefor your target:stedgeai generate -m mobilenetv2_a035_128_int8.tflite --target stm32n6 --st-neural-artInspect the generated files in
./st_ai_output/:
network.c/.h: model-specific optimized C code. Think of it as the low-level implementation of the neural network.
stai_network.c/.h: STAI client API wrapper for this model. This is the layer exposing functions such asstai_network_init(),stai_network_set_inputs(),stai_network_run(), andstai_network_deinit().
network_generate_report.txt: full generation report
network_c_info.json: machine-readable generation summary, useful for scripts and faster validation with--val-json.
mobilenetv2_a035_128_int8_OE_3_3_1.onnxandmobilenetv2_a035_128_int8_OE_3_3_1_Q.json: intermediate files used as input to the ST Neural-ART compiler
network_atonbuf.xSPI2.raw: raw memory initializer for the data the NPU expects in XSPI2 memory, mainly weights and parameters. It is programmed to memory separately from the C firmware.For this STM32N6 STAI generation,
network.candstai_network.care not alternatives: they are two parts of the same generated model package and are normally compiled together.You may see
network_data.c/.hmentioned in generic STM32 examples — those are the model weights emitted as C arrays and linked into the firmware. In this STM32N6 Neural-ART flow the weights are instead emitted as a separate memory initializer file (network_atonbuf.xSPI2.raw), sonetwork_data.*is not generated. This is expected.See Generate command for the full option reference, and STAI API for all details about the Embedded Inference client ST Edge AI API.
Out of scope: Integrate the model code into your STM32 project.
4. Running validation on target 
On-target validation runs inference on the board and compares output to the original model, reporting accuracy metrics and real measured inference time.
Getting a validation firmware from STM32Cube AI Studio 
A validation firmware must be flashed on the board before running
validate. The firmware embeds the C model and a serial communication stack used by thevalidatecommand.To get the validation firmware from STM32Cube AI Studio:
Create a project targeting STM32N6570-DK (see Getting Started with STM32Cube AI Studio).
Import
mobilenetv2_a035_128_int8.tfliteas the model and keep all default options.Click Run.
Once the run completes, click Generate code, then set:
Project Variant:
ValidationType of generation:
Generate projectBuild the generated project with STM32CubeIDE or your preferred toolchain. Here are the steps for STM32CubeIDE:
Click Open project in explorer from STM32Cube AI Studio
Open the
.projectfile in the STM32CubeIDE folderBuild the
<project_name>_AppliprojectNote the location of the generated binary:
<project_name>_Appli.elfNote
For STM32N6, the pre-built N6 validation project bundled with ST Edge AI Core can also be used directly, without STM32Cube AI Studio. See How to deploy and evaluate a model on STM32N6.
Flashing the validation firmware on the STM32N6570-DK 
Open STM32CubeProgrammer.
Put the STM32N6-DK in DEV mode by putting the bottom slider labeled
BOOT1to the right (“H” position).Connect the board to your PC using the USB-C connector labeled
STLINK V3EC.In STM32CubeProgrammer, on the External loaders tab (bottom right), select the external loader
MX66UW1G45G_STM32N6570-DK.Click Connect.
On the Erasing & Programming tab, browse the
.elfAppli binary generated previously by STM32CubeIDE.Check the Verify programming option.
Click Start Programming.
Once programming is complete, click Disconnect.
Running the validation firmware 
In STM32CubeIDE, right-click the project labeled
<project_name>_Applion the sidebar.Click Run as -> Run Configurations….
Select “STM32 C/C++ Application” in the sidebar and click the “New launch configuration” icon above.
On the sidebar, under “STM32 C/C++ Application”, select the configuration that was just created, named
<project_name>_Appli Debug.In the Startup tab, double-click the first line in the “**”Load Image and Symbols” table**” to open the “Add/Edit item” window.
Uncheck “Download” and click OK.
Then, click the “Add” button, select the FSBL project (
<project_name>_FSBL) and click OK.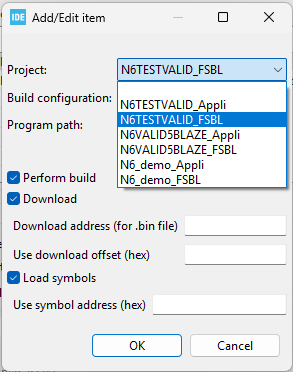
You should have the following configuration:
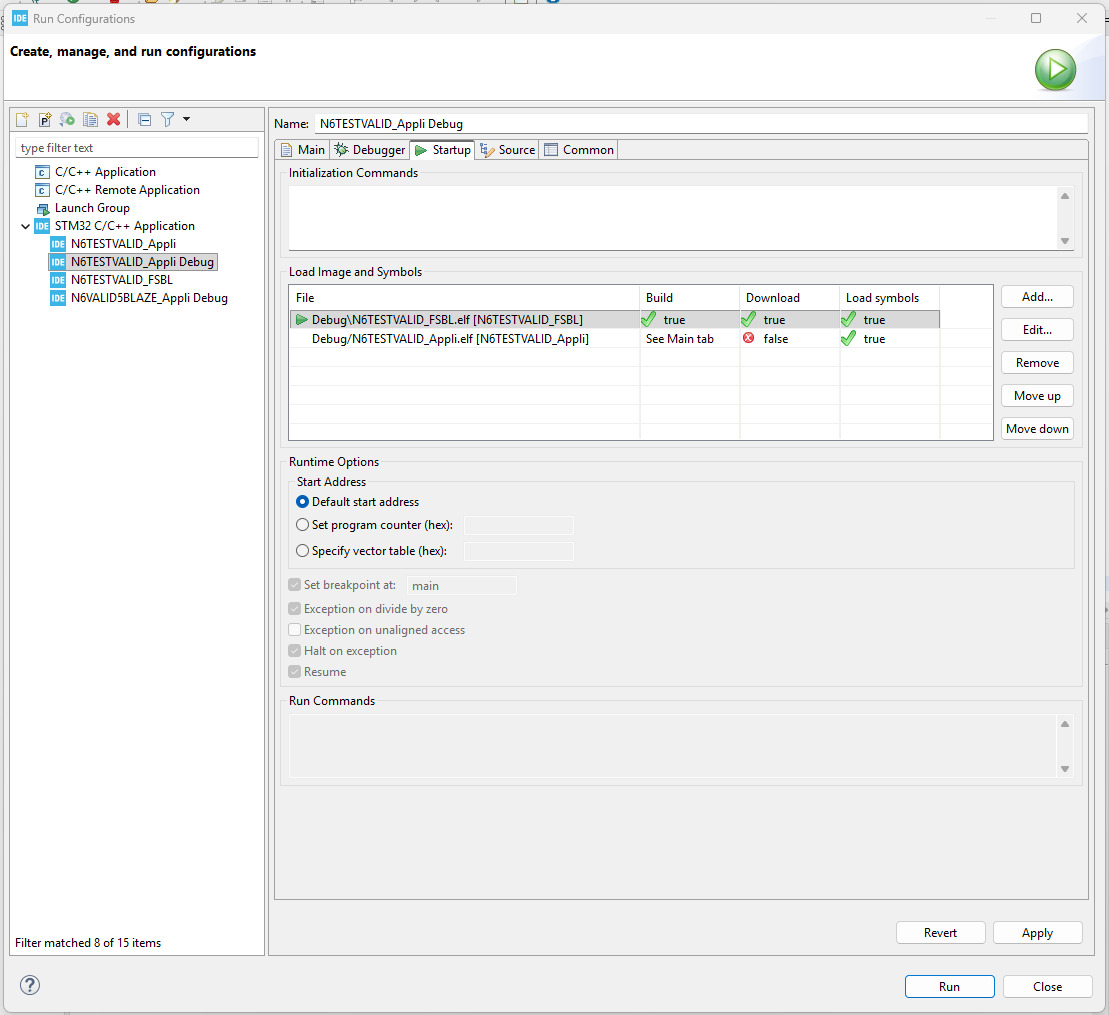
Click Run. The Validation firmware is now running on the STM32N6-DK.
Running validation and checking metrics with ST Edge AI Core CLI 
Open a terminal, and go to the folder containing the
mobilenetv2_a035_128_int8.tflitemodel downloaded previously.Run the following command to validate the model on target:
stedgeai validate -m mobilenetv2_a035_128_int8.tflite --mode target --target stm32n6 --st-neural-artImportant
By default,
validateuses randomly generated inputs. It is always recommended to use real data when running validation on target. With random data, the X-cross metrics (comparing C model output to the original model output) can appear excellent (cosine similarity ≈ 1) even when the deployed model has poor real-world accuracy. This effect is especially misleading for quantized (INT8) models: random inputs do not reflect the actual data distribution the model was trained on.Add the
-vioption to the validate command (for example,-vi my_dataset.npz) to provide a real, preprocessed dataset (npz,npy, orcsv). Thenpzfile should contain inputs under thex_testkey and optionally ground-truth labels undery_test.See Specific attention on the provided data and Input validation files in the official docs.
Reading the report
Report section
What to check
Model summary
weights: Flash needed for model weights.
activations: RAM needed at runtime.
macc: total multiply-accumulate operations (complexity indicator).Evaluation report (summary)
acc: accuracy, only meaningful for classification with real data and ground-truth labels; otherwise shown asn.a..
l2r: L2 relative error between C model and original model. Lower is better. For float32 models, a value < 0.01 indicates close matching. For quantized INT8 models deployed on the Neural-ART NPU, larger values are typical due to quantization error — usecosandsnras complementary indicators rather than applying a fixed threshold.
cos: cosine similarity between C model and original model outputs. Range(0, 1], best = 1. A value ≥ 0.99 indicates high similarity.
snr: Signal-to-Noise Ratio in dB. Bigger is better.
nse: Nash-Sutcliffe efficiency. Best = 1, range = (-inf, 1].
rmse/mae: Root Mean Squared Error and Mean Absolute Error.All X-cross metrics are most meaningful with real data; with random inputs they can appear near-perfect even for a poorly performing model.
Inference time
duration: mean inference time per sample in ms.The per-node table breaks down execution by epoch block, with
typeindicating execution mode:EC(NPU hardware),SW(CPU-only software),HYBRID(mixed CPU+NPU).The summary line reports
HW/SW/SW ctrlpercentages — useful for checking how much of the inference is offloaded to the NPU.See Evaluation report and metrics for a complete description of all metrics.
Next steps 
Automate CLI workflows — batch validation, scripted non-regression pipelines → How to validate a neural network on STM32N6
Python-based inference (AI Runner) — validate locally without a board → How to use the AiRunner package
Build a full STM32N6 application — integrate model code into a complete project → How to deploy your AI model on STM32N6
Full CLI reference — all commands, options, and examples → ST Edge AI Core CLI documentation
Troubleshooting 
- Board not detected / ``LOAD ERROR``
Verify the board is powered and the USB cable is connected to the CN1 USB-C STLINK connector. Specify the port explicitly:
--desc


                serial:COM16
(Windows) or--desc serial:/dev/ttyACM0(Linux).- Timeout or baud rate mismatch
Add the baud rate to the descriptor:
--desc


                serial:COM16:921600
. STM32N6 validation firmware defaults to 921600 baud; generic STM32 to 115200.- Hash mismatch warning
The firmware on the board was built with different generation options. Re-run
generate, rebuild the firmware in the validation project, and reflash the board.- High L2R error (X-cross > 0.01)
May indicate a quantization mismatch or incorrect input preprocessing. Verify that the data type and preprocessing match what the model expects. See evaluation metrics.
For additional help, use the ST Community Edge AI forum.