
 general

How to install the STM32 model zoo 
This article explains how to install the STM32 model zoo in STMicroelectronics environment.
Set up the proxy and SSL variables 
If you work behind a proxy, you must set the
http_proxy
and
https_proxy
environment variables (and, optionally,
NO_SSL_VERIFY) before installing the Python™ packages with
pip
or accessing the ST Edge AI Developer Cloud. You need your proxy URL, port, and credentials.
Warning
Every example below uses made-up values. Nothing is replaced automatically: you must replace each of them with your own before running any command.
|
Example value (to replace) |
Replace it with |
|---|---|
|
|
your proxy user name |
|
|
your proxy password (UTF-8 encoded if it contains special characters) |
|
|
your proxy server URL |
|
|
your proxy port |
|
|
the e-mail of your myST account |
|
|
your myST account password (not encoded) |
Note
If your proxy password contains special characters such as
@,%,&or!, UTF-8 encode it (for example,Edge@AIbecomesEdge%40AI). You can use an online encoder.Use the same value, always starting with
http://, for bothhttp_proxyandhttps_proxy. Usinghttps://forhttps_proxycan cause certificate issues.
You can set these variables through the Windows® GUI (option 1) or from a terminal (option 2).
Option 1: Windows® GUI 
Press the Windows button, type “environment variables”, and open Edit the system environment variables (or Edit environment variables for your account).

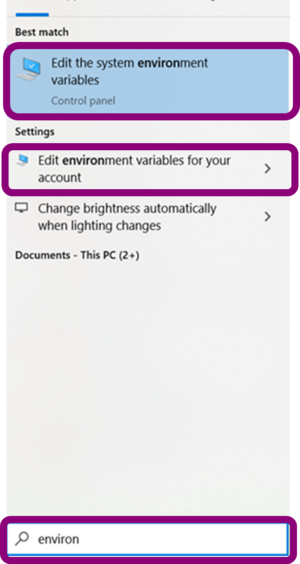
Click New… and add each of the following variables (repeat New… for each one), then click OK to save.
|
Variable name |
Variable value |
|---|---|
|
|
|
|
|
|
|
|
|
|
|
|
|
|
|
The optional
stmai_username
and
stmai_password
variables store your myST credentials, so you are not prompted for them each time you connect to the ST Edge AI Developer Cloud. They must be named exactly.
Option 2: terminal (CLI) 
Set the variables from a terminal. Every example value below is fictitious — replace it with your own.
Windows® – Command Prompt
(the
set
command applies to the current session only; use
setx
instead of
set
to make a variable permanent):
set http_proxy=http://john.doe:Wond3rl4nd@my-proxy.replace-me.example:XXXX
set https_proxy=http://john.doe:Wond3rl4nd@my-proxy.replace-me.example:XXXX
set NO_SSL_VERIFY=1
set stmai_username=john.doe@acme-corp.example
set stmai_password=S3cr3tP@ssw0rd
Check a value with
echo


             %http_proxy%
.
Windows® – PowerShell
(to persist a variable, set it with the
SetEnvironmentVariable
method of
System.Environment
instead of
$env:):
$env:http_proxy = 'http://john.doe:Wond3rl4nd@my-proxy.replace-me.example:XXXX'
$env:https_proxy = 'http://john.doe:Wond3rl4nd@my-proxy.replace-me.example:XXXX'
$env:NO_SSL_VERIFY = '1'
$env:stmai_username = 'john.doe@acme-corp.example'
$env:stmai_password = 'S3cr3tP@ssw0rd'
Linux®:
export http_proxy='http://john.doe:Wond3rl4nd@my-proxy.replace-me.example:XXXX'
export https_proxy='http://john.doe:Wond3rl4nd@my-proxy.replace-me.example:XXXX'
export NO_SSL_VERIFY=1
export stmai_username='john.doe@acme-corp.example'
export stmai_password='S3cr3tP@ssw0rd'
To make these permanent on Linux, add the same
export
lines to the end of your
~/.bashrc
file, then run
source


             ~/.bashrc
.
Install ST Edge AI 
ST Edge AI Developer Cloud (option 1) 
The first option is to use the ST Edge AI Developer Cloud. With this option, you can use all the functionality of ST Edge AI without installing it locally. Using this option requires an internet connection.
Create an account on myST and then sign in to the ST Edge AI Developer Cloud to have access to the service. The creation of an account and the use of this service is free of charge.
ST Edge AI command-line interface only (option 2) 
Alternatively, you can choose to install only the STEdgeAI-Core command-line interface (CLI).
For this purpose, first download the latest version of STEdgeAI-Core for your operating system. Then, to be able to use the CLI, follow the process below.
Unzip the content of the zip package en.stedgeai-<os>.zip and launch the installer file stedgeai-windows-onlineinstaller. This will launch the installation wizard following the stepwise process you will have the STEdgeAI-Core installed.
As the name suggests, it is an online installer and requires you to have internet connection and the myST user account for the installation. During the process the users can select to install all or selected components of the STEdgeAI-Core functionality to generate the Code for their AI models and algorithm for different ST Targets. For deploying on STM32N6 and STM32MCUs it is sufficient to install “STM32 MCU module” and “ST Neural_ART module”.
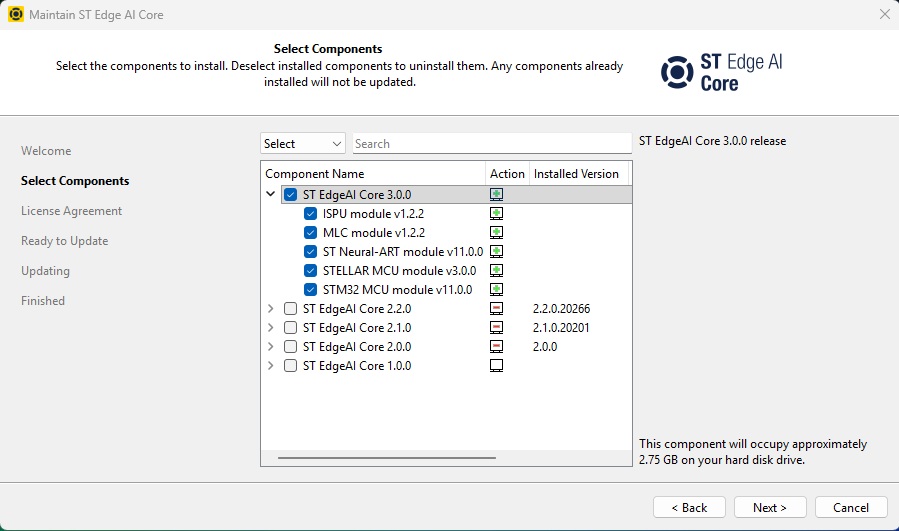
For example for STEdgeAI-Core v3.0.0 the available options are:
ISPU module v1.2.0 (to run the AI models on MPU devices)
MLC module v1.2.0 (to run the AI models on the MLC enabled sensors)
ST Neural-ART module v11.0.0 (to run the AI models on the NPU powered MCUs like STM32N6)
STELLAR MCU module v3.0.0 (to run the AI models on the STELLAR MCU family)
STM32 MCU module v11.0.0 (to run the AI models on the STM32MCU targets).
NOTE: The version mentioned in the screenshot is just for the demo purposes, the user should always install the latest version of the ST Edge AI Core to stay compatible with the version of STM32AI Model Zoo version.
Once installed successfully, the users are required to provide the path to the stedgeai binary file. For example for Windows OS, if a default configuration is used the file can be found at the path:
C:/ST/STEdgeAI/<version>/Utilities/windows/stedgeai.exe
for STEdgeAI-Core <version>. Provide the correct path for your installation in the configuration .yaml files of the stm32ai-modelzoo-services.
Warning
The presence of blank spaces in the path for ST Edge AI might result in errors. Make sure to install in a path without blank spaces in it.
Install STM32 model zoo 
STM32AI Model zoo has two repositories.
stm32ai-modelzoo-services: a set of services and scripts used to ease end to end AI models integration on ST devices.
stm32ai-modelzoo: a collection of reference machine learning models that are optimized to run on STM32 microcontrollers.
Installation with git clone (option 1) 
Installing git client 
If not already installed, install git on your machine. For Windows, install git for Windows and or Linux, install git through terminal by using apt-get:
$ sudo apt-get update
$ sudo apt-get install git
[Optional]: To use git behind a proxy, add the following lines to the git config file. If the file does not exist already, create an empty file. For Windows, the file is located under “C:/Users/username/.gitconfig”. For Linux, the file must be located under ~/.git/config. For the password it has to be utf-8 decoded (”&” translates to “%26”, “@” is translated to “%40”)…
[user]
    name = John Doe
    email = john.doe@acme-corp.example
[http]
    sslVerify = false
    proxy = http://john.doe:Wond3rl4nd@my-proxy.replace-me.example:XXXX
[https]
    sslVerify = false
    proxy = http://john.doe:Wond3rl4nd@my-proxy.replace-me.example:XXXX
Installing git lfs (only needed for stm32ai-modelzoo) 
As some of the pretrained model files in the stm32ai-modelzoo repository can be larger than normal GitHub file size budget, the repository uses
git


              lfs
. So before cloning the stm32ai-modelzoo repository, the user needs to install and setup the
git


              lfs
(large file system) extension. This can be done following the steps below:
On Ubuntu:
sudo apt-get install git-lfs
On Windows:
Download and install it from here.
Once Git LFS is installed set it up using the following command:
$ git lfs install
Git LFS initialzed.
If the command runs successfully you should see Git LFS initialized. message. If you do not see this message visit the GitHub documentation page for more details and support.
Cloning the repositories 
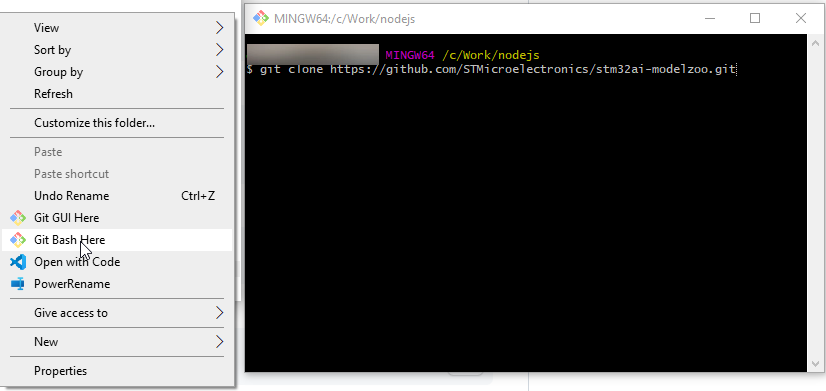
Go to the directory where you want to download the model zoo script. You can use a Powershell or Command prompt. For Windows, and terminal for Linux, and enter the command to clone the repositories:
$ git clone https://github.com/STMicroelectronics/stm32ai-modelzoo.git
Cloning into 'stm32ai-modelzoo'...
:
:
$ git clone https://github.com/STMicroelectronics/stm32ai-modelzoo-services.git
Cloning into 'stm32ai-modelzoo-services'...
:
:
Initialize Git Submodules (optional) 
To reduce the size of the model zoo services repository, the deployment application code is not downloaded automatically when cloning the repository. Instead, it can be fetched on demand when the deployment is needed to be performed. This can be managed through submodule functionality of git. To get the application code for all the use cases navigate to the “stm32ai-modelzoo-services” directory, and initialize the submodules:
git submodule update --init --recursive
The other option is to get the individual submodules needed. For example, if one wants to deploy only the
image_classification
models on STM32N6, the corresponding submodule can be obtained by executing following command:
git submodule update --init --recursive application_code/image_classification/STM32N6
The path to all the submodules can be found in the
.gitmodule
file in stm32ai-modelzoo-services directory.
Installation from a ZIP (option 2) 
An easy way to download without the need to install git for Windows is to download the repository as a ZIP archive. Go to stm32ai-modelzoo github or stm32ai-modelzoo-services github and click on Download ZIP from the menu “Code” as shown below:
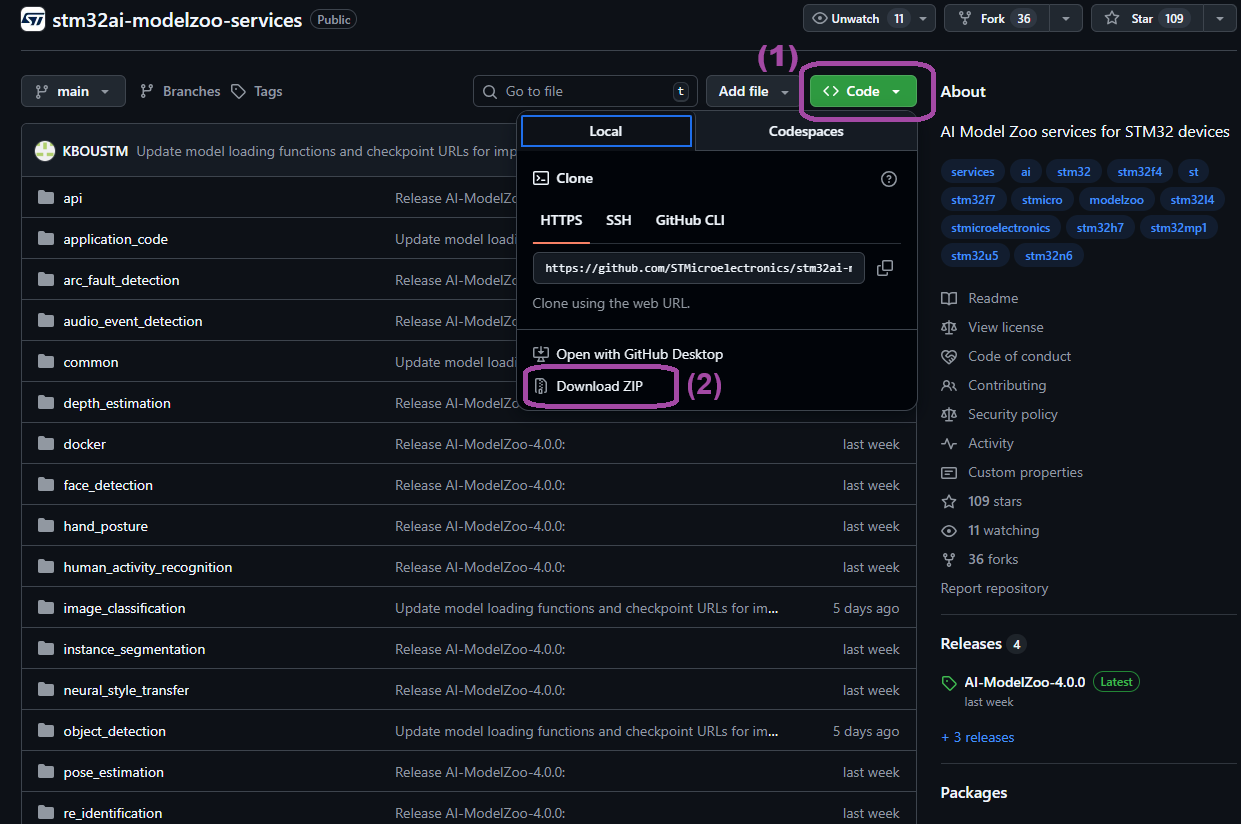
Then extract to your target directory.
Install the Python™ environment 
Prerequisites 
If you don’t have Python installed already, you can download and install it from here. For the stm32ai-modelzoo-services we recommend to use Python 3.12.
For Windows systems, make sure to check the Add python.exe to PATH option during the installation process.
Having multiple versions installed can be a problem. Therefore, it is recommended to remove the paths for the other Python versions installed and keep only the one installed for STM32 Model Zoo.
For Linux, add the path of the Python installation to your paths using the export command or by modifying the ~/.bashrc file.
When using a GPU, make sure to install the GPU drivers. For NVIDIA GPUs, refer to https://docs.nvidia.com/deeplearning/cudnn/install-guide/index.html to install CUDA and CUDNN.
NOTE: When using GPU devices with Windows OS, it is not recommended to use WSL as it can result in suboptimal acceleration for training on GPU.
Python™ environment creation 
It is recommended to create a virtual environment for the installations of the python dependencies, so that the versions are isolated from other projects. This can be done by following one of the two things.
Python™ virtual environment (option 1) 
For Windows, open a Powershell or Command prompt terminal.
For Linux, open a terminal.
Navigate to the model zoo directory and create a Python virtual environment for the project using venv:
cd stm32ai-modelzoo-services
python -m venv st_zoo
Activate your virtual environment.
For Windows run:
st_zoo\Scripts\activate.batFor Linux run:
source st_zoo/bin/activateThen install all the necessary Python packages. A list of all the required Python packages is provided in requirement.txt file.
pip install -r requirements.txt
Python™ conda environment (option 2) 
An alternative is to create a conda virtual environment for the project. Install Miniconda.
If you are using conda environment, optionally if the proxy variables have not been configured for your terminal prompt, you can also use the .condarc file to store the proxy information. This can be done by creating a .condarc file and place it in the path C:/Users/username/ for Windows and $HOME for Linux. The .condarc file must contain:
proxy_servers:
   https: http://john.doe:Wond3rl4nd@my-proxy.replace-me.example:XXXX
   http: http://john.doe:Wond3rl4nd@my-proxy.replace-me.example:XXXX
ssl_verify: false
Note: Refer to section Set up the proxy and SSL variables for the UTF encoding and proxy URLs.
For Windows, open an Anaconda PowerShell Prompt. For Linux, open a terminal.
Go to the model zoo folder:
cd stm32ai-modelzoo-servicesCreate a conda environment:
conda create -n st_zooActivate your virtual environment:
conda activate st_zooInstall Python 3.12 from the conda-forge open source repository:
conda install -c conda-forge python=3.12
pyenv for virtual environment (option 3) 
Install pyenv on your machine. You can run following command:
curl httpts://pyenv.run | bash
If there is an error, check that the proxies are set properly. To start pyenv automatically at the start of your sessions, add the following lines in your
.bashrc
file.
export PYENV_ROOT="$HOME/.pyenv"
command -v pyenv >/dev/null || export PATH="$PYENV_ROOT/bin:$PATH"
eval "$(pyenv init --path)"
eval "$(pyenv init -)"
Then save, exit and reload the changed
.bashrc
by running:
source ~/.bashrc
To download and install Python 3.12.9 launch the following command:
pyenv install 3.12.9
Once it is installed run the following command to create the virtual environment:
pyenv virtualenv 3.12.9 st_zoo
This will create a virtual environment named as st_zoo. To activate this environment launch following command:
pyenv activate st_zoo
( optional) Setting up Nvidia GPU 
If using NVIDIA GPU, install cudatoolkit and cudnn and add to the conda path:
conda install -c conda-forge cudatoolkit=11.8 cudnn
Add cudatoolkit and cudnn to the path permanently:
mkdir -p $CONDA_PREFIX/etc/conda/activate.d
echo 'export LD_LIBRARY_PATH=$LD_LIBRARY_PATH:$CONDA_PREFIX/lib/' > $CONDA_PREFIX/etc/conda/activate.d/env_vars.sh
Installing Python packages and dependencies 
Once the virtual environment is created following your preferred setup and activated, install all the necessary Python packages. This can be done by running the following command inside your virtual environment (for CPU only):
pip install -r requirements.txt
Or for machines with GPU run:
pip install -r requirements_gpu.txt
NOTE: Building PESQ and PyCOCOTools require C++ Build Tools for compiling and building the wheel files. If you are not using AED and Object Detection use-cases you can simply remove these from the requirement.txt files.
Install STM32CubeIDE 
To train a model, you do not need to rebuild an STM32 firmware. On the contrary, to deploy on a Getting Started Application package, you must be able to build the corresponding firmware. This can only be done locally through STM32CubeIDE.You must then install STM32CubeIDE following the instruction of the STM32CubeIDE installation guide. STM32AI Model Zoo Services uses STM32CubeIDE version 1.17.0. Using other versions might result in issues.
Warning
The presence of blank spaces in the paths for
stedgeai.exe
or
stm32cubeide.exe
might result in errors. Make sure to install in paths without blank spaces in them.
Note: The deployment of the models works, even without having the local installation of ST Edge AI, by using ST Edge AI Developer Cloud. Refer to section ST Edge AI Developer Cloud (option 1) to find out how.
Update the model zoo yaml file with the installation path 
When using a local installation either for training or deployment, the yaml file must be updated with the correct paths. Update the variables with your installation paths:
path_to_stedgeai: C:/ST/STEdgeAI/3.0/Utilities/windows/stedgeai.exe
path_to_cubeIDE: C:/ST/STM32CubeIDE_1.17.0/STM32CubeIDE/stm32cubeide.exe
Note: Here
path_to_stedgeai
is provided for a user using Windows OS and default configurations to install STEdgeAI-Core version
3.0.0. Replace these paths with the paths you have for the installation.