
 general

Getting Started with STM32Cube AI Studio 
STM32Cube AI Studio enables you to deploy, validate, and benchmark AI models directly on STM32 microcontrollers — from ONNX, TFLite, or Keras input all the way to optimized C code ready to integrate into your application.
It unifies ST Edge AI Core, STM32CubeMX, and STM32CubeProgrammer into a single workflow, letting you measure real inference time, per-layer memory usage, and numerical accuracy on a connected STM32 board in just a few clicks.
This tutorial is an introduction to STM32Cube AI Studio, but also refers to important concepts from the ST Edge AI Core, the underlying CLI used for code generation and model validation.
Objective 
Import a model, validate its performance on a STM32N6 microcontroller’s NPU, and generate optimized model C code ready for integration in your STM32 AI project.
Summary 
Create a project targeting the STM32N6570-DK
Configure the target options, memory pools, and validation settings
Run model validation on target
Check validation report metrics
Generate the optimized model C code or a full project template
0. Prerequisites 
Hardware 
This tutorial focuses on the STM32N6 microcontroller, embedding the ST Neural-ART™ Accelerator Neural Processing Unit (NPU). It uses the STM32N6570-DK as the reference board.
|
Feature |
✔ With board |
✘ Without board |
|---|---|---|
|
Run model validation on-host (PC) |
✔ |
✔ |
|
Generate optimized model C code |
✔ |
✔ |
|
Run model validation on-target (STM32) |
✔ |
✘ |
|
Measure inference times and per-layer memory usage |
✔ |
✘ |
|
Flash and run on STM32 |
✔ |
✘ |
Installs and dependencies 
Component
Minimum version
Purpose
—
Main tool (this tutorial)
4.0.0
AI model validation and code generation
6.16.0
Project configuration and code generation
2.19.0
Device programming
2.0.0
IDE for development
Arm v9.2x
(Optional) IDE for development
uV4
(Optional) IDE for development
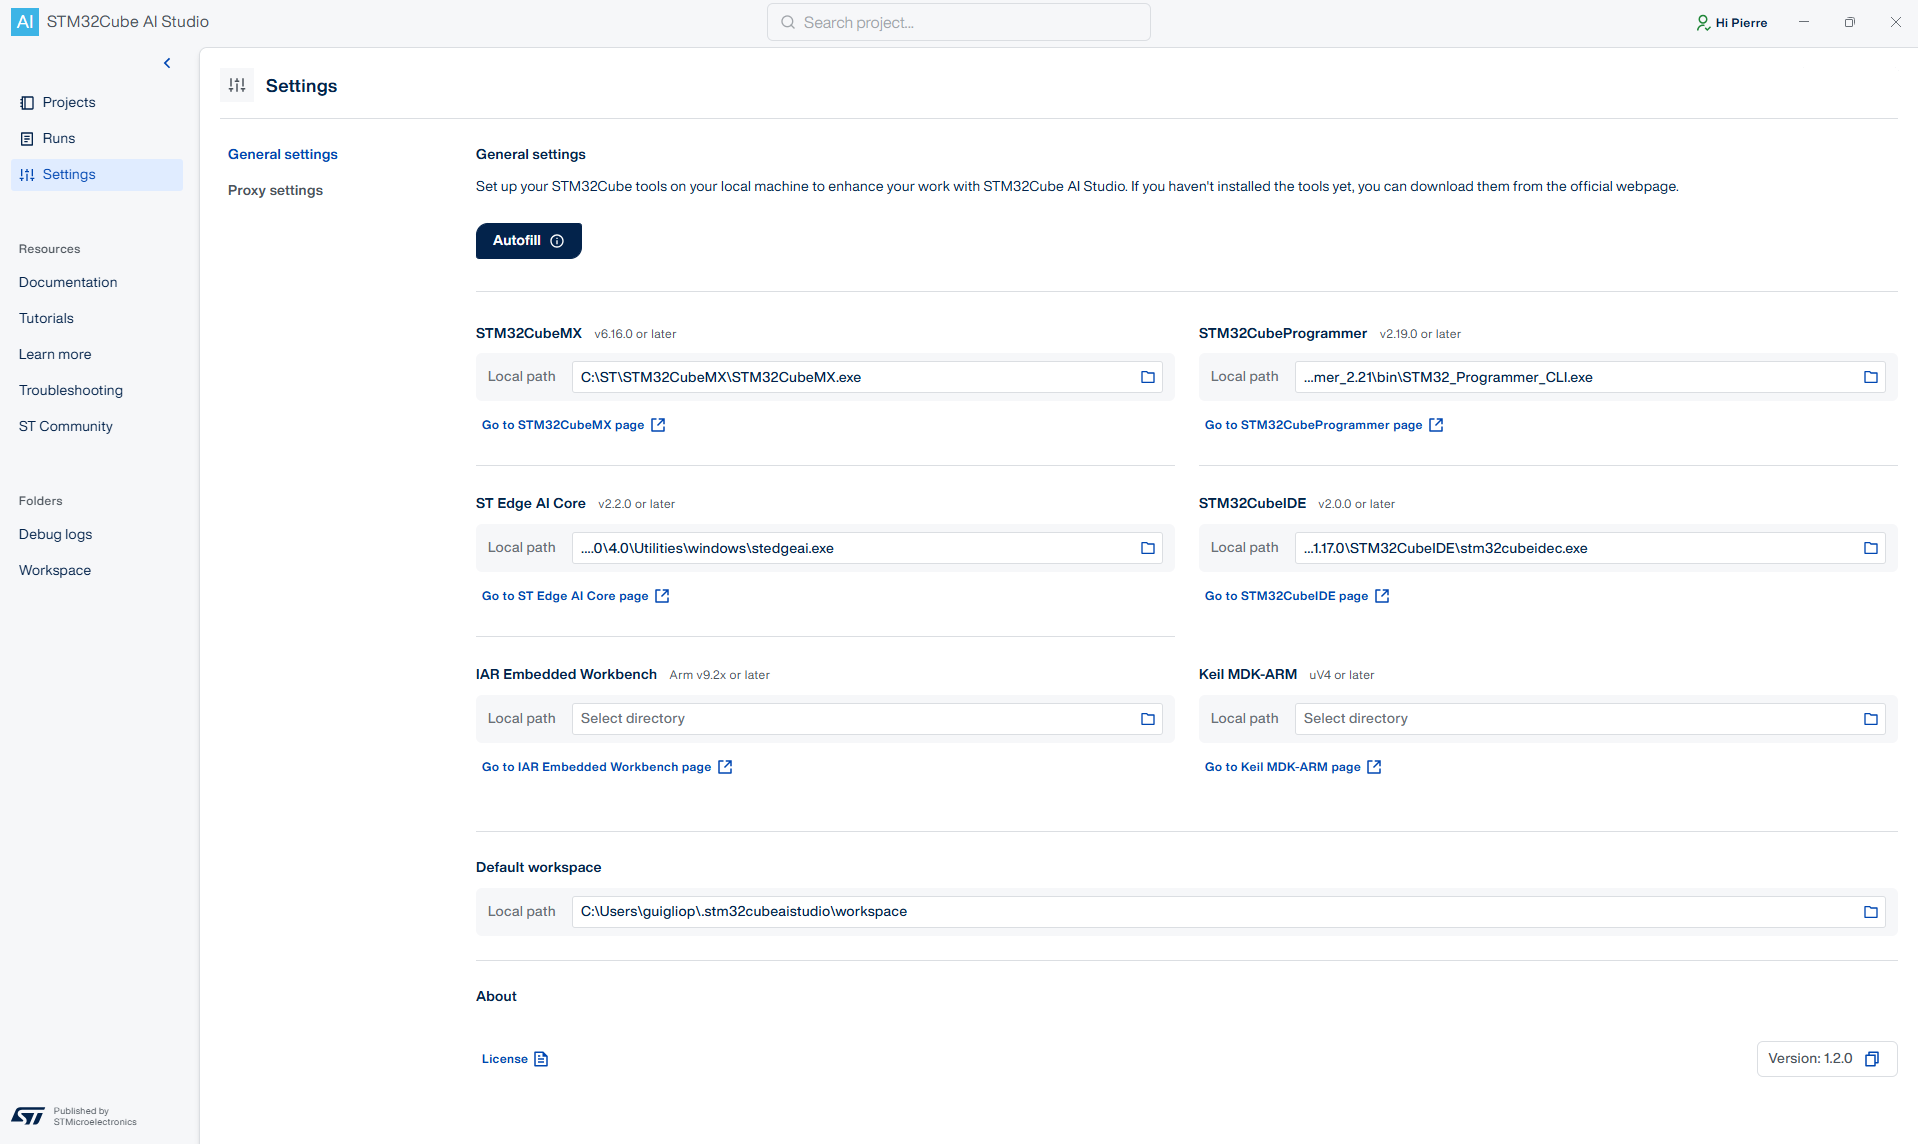
Check the dependency paths in Settings
After installing all components, open STM32Cube AI Studio, go to Settings, and verify that the paths to ST Edge AI Core, STM32CubeMX, STM32CubeProgrammer, and your IDE executable are correctly configured. STM32Cube AI Studio cannot perform model generation, build, or flash steps without them.
Example neural network model 
This tutorial uses the MobileNetV2 α=0.35 — 128×128 INT8, in
.tfliteformat, as an arbitrary example. It is a compact image classification model pre-trained on ImageNet and post-training quantized to INT8 for efficient deployment on AI-accelerated STM32.Download it from the model zoo: mobilenetv2_a035_128_int8.tflite
Note
The ST Model Zoo is an open-source repository of pre-trained, STM32-optimized AI models for image classification, object detection, audio classification, and more. Each model comes with training scripts and configuration files.
The ST Model Zoo Services provide Python scripts for training/tine-tuning, evaluation, and quantization of a model before deployment.
Create a project 
Click the “+ Project” button, and select “From scratch”.
Enter a project name. Keep the default workspace path (recommended) or choose a custom location.
Select the STM32 target “STM32N6570-DK”.
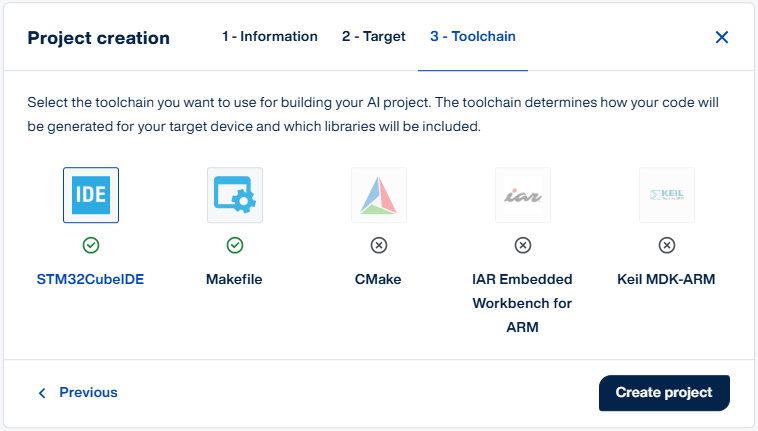
Select “STM32CubeIDE” as the toolchain (or Keil or IAR) and click “Create Project”.
Put the STM32N6-DK in DEV mode by putting the bottom slider labeled
BOOT1(top-right corner of the board) to the right (“H” position). TheBOOT2position is irrelevant here.Connect the board to your PC using the USB-C connector labeled
STLINK V3EC.
Configure the model validation run 
In this section, we run default on-target validation and explain some configuration options.
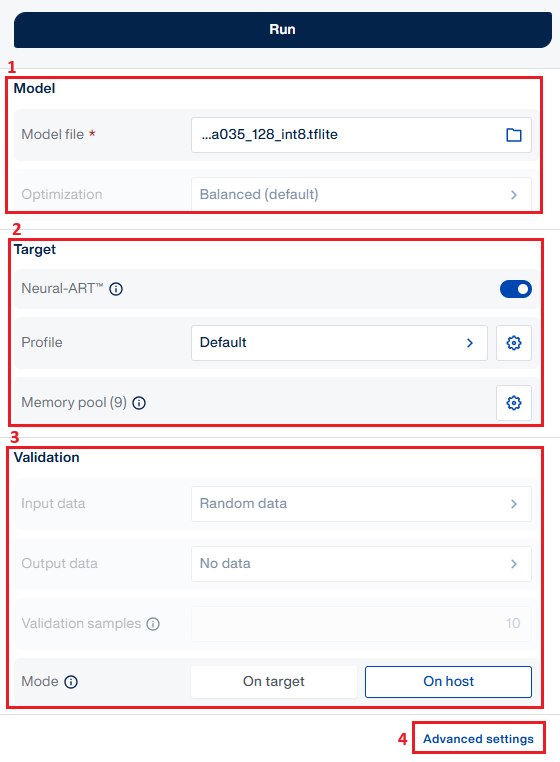
You may fast-forward by selecting your model file, leaving all settings as defaults, selecting validation mode: “ On target ”, and skipping to the section: run validation and check metrics.
1. Model import 
Click the “Model file” input field and select the
mobilenetv2_a035_128_int8.tflitefile downloaded earlier.Leave “Optimization” set to default (“Balanced”, which strikes a good compromise between inference time and memory usage).
2. Target options 
These options expose target-specific settings for STM32, such as enabling the Neural Processing Unit (ST Neural-ART, for example on STM32N6) or the Hardware Signal Processor (HSP, for example on STM32U3).
Enable Neural-ART — activates the ST Neural-ART™ NPU for model execution. Without this, inference runs on the Cortex-M55 CPU only, with significantly higher latency.
Leave “Profile” and Profile settings (under the gear icon) as defaults.
Note
This is equivalent to the command-line option--st-neural-artin the ST Edge AI Core CLI.Click the gear icon to see the full list of compiler and CLI options available for this target.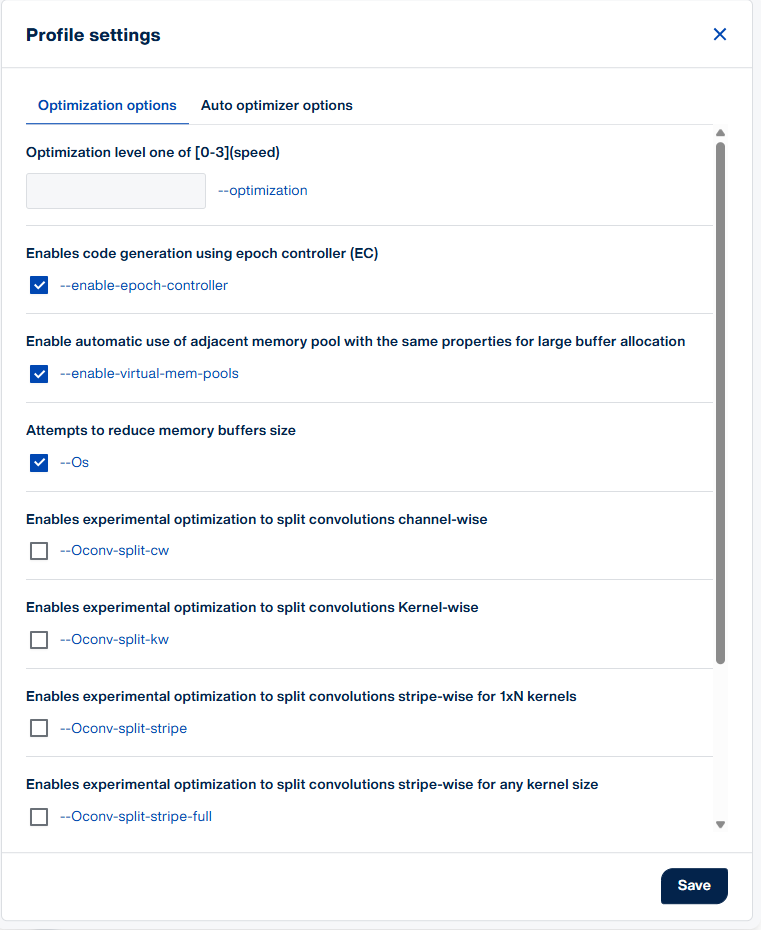 Note here that the “Epoch Controller” is enabled by default.The Epoch Controller is a hardware finite state machine on the Neural-ART NPU,
which decodes a pre-compiled command stream to configure NPU processing units at runtime, removing that overhead from the MCU. See ST Neural-ART NPU concepts
for details.
See ST Neural-ART NPU concepts for more details.
Leave “Memory pool” configuration as default.
Note
Memory pools define the memory regions available for the model’s activation buffers and weights. You can enable or disable individual RAM and Flash regions, and STM32Cube AI Studio automatically optimizes the allocation across the regions you allow.
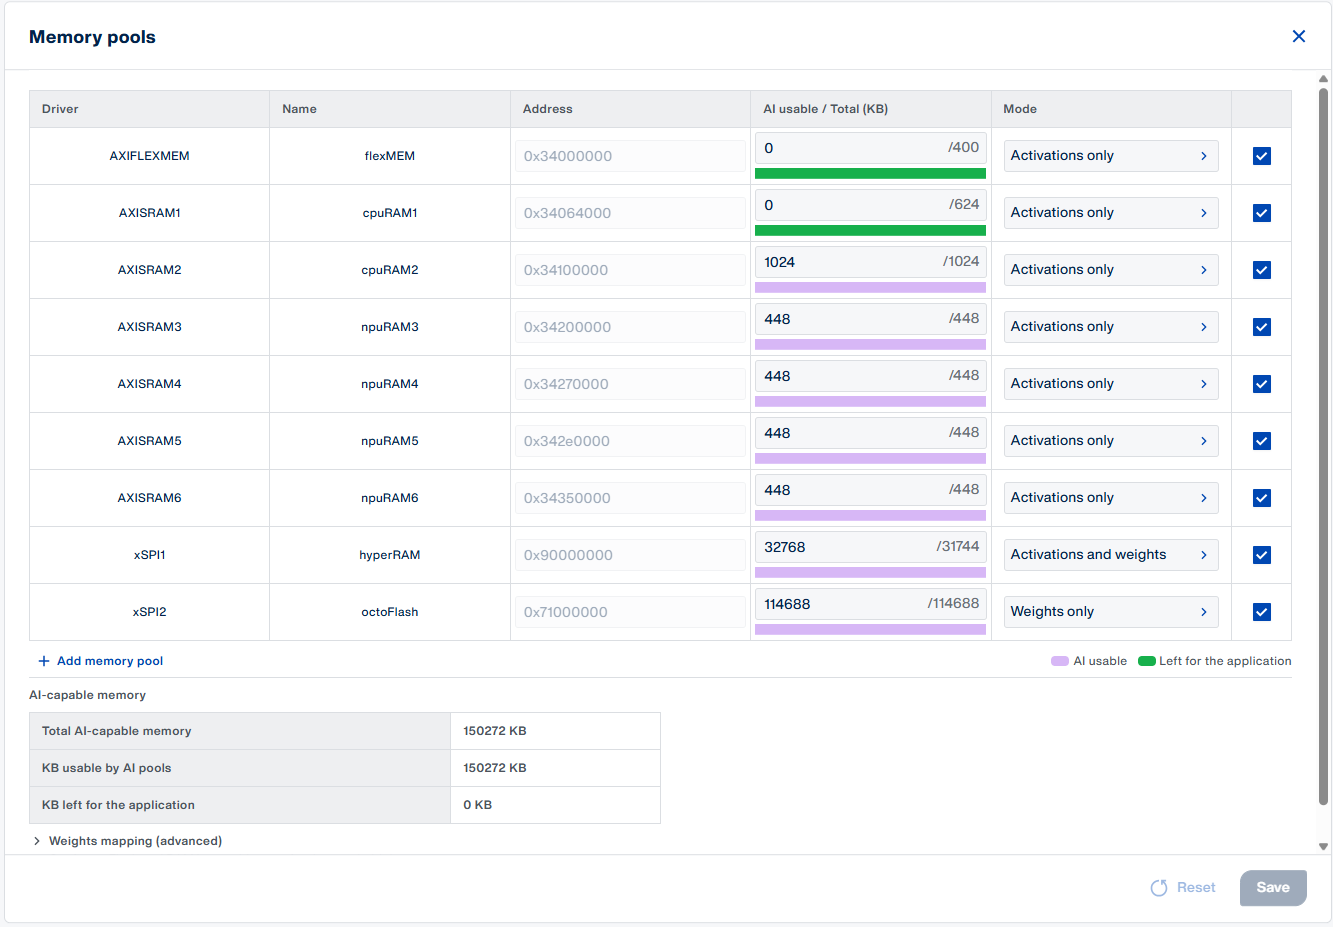
3. Validation settings 
For quick validation, set “Input data” to Random data.
For quick validation, set “Output data” to No data.
Important
It is strongly recommended to use real, preprocessed, representative data when validating on target. With random data, X-cross metrics (cosine similarity, L2R) can appear near-perfect even when the deployed model has poor real-world accuracy — especially for quantized INT8 models, where random inputs do not reflect the training data distribution.
To use real data, provide an input file in one of the following formats:
.npz— NumPy archive; must contain inputs under the keyx_testand, optionally, ground-truth labels undery_test
.npy— raw NumPy array of inputs
.csv— inputs as comma-separated valuesThe preprocessing (normalization, resizing, channel ordering, etc.) must match what the model was trained with.
See Evaluation report and metrics for details.
Set “Validation samples” to 10. This is the number of model inferences to run during validation.
Set “Mode” to On target. This runs the validation on the STM32N6570-DK board instead of locally on the host.
Note
Optionally, select “On host” to run the validation locally on your PC without flashing the board.This is useful for quick checks, but it does not measure real-world performance on the target hardware.
4. Advanced settings 
The “Advanced settings” panel exposes additional options for compression, optimization, buffer allocation, code generation and model validation.
For this tutorial, leave all advanced settings as defaults.
See the ST Edge AI Core documentation for a full description of all available options.
Run model validation on target 
Click the “Run” button to start the automated model validation pipeline.In summary, here is what happens:
STM32CubeMX creates a validation application for the STM32N6570-DK. The system clocks are set to their maximum frequency to measure inference time under best-case performance conditions.
ST Edge AI Core generates optimized C model files from the TFLite input.
STM32CubeIDE (or the selected toolchain) builds the validation project.
STM32CubeProgrammer flashes the binaries to the board.
ST Edge AI Core runs 10 model inferences on the board and collects all validation metrics.
Note
If the run fails, the embedded logs usually provide actionable advice. See below an example of a run that failed during the flash step because the ST-LINK firmware was outdated. This was solved by upgrading the ST-LINK firmware using STM32CubeProgrammer.
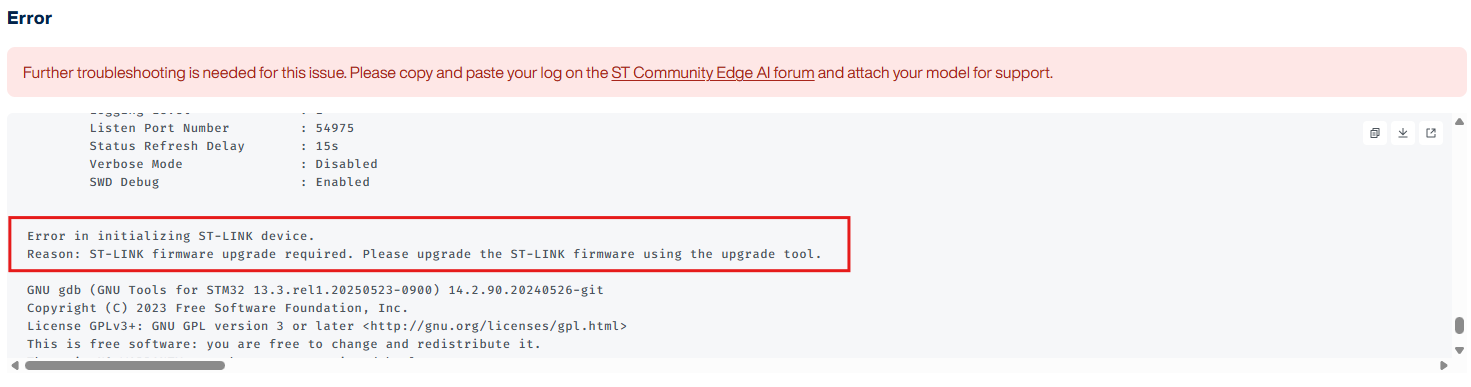
For further troubleshooting, visit the ST Community forums.
Check the validation metrics 
Validation report 
When the run is complete, the Validation report opens automatically.
Key metrics
Metric
Value (example)
What it means
Inference time
~5.8 ms
End-to-end duration per input sample on the STM32N6 with Neural-ART NPU
Flash usage
~3.4 MB
ROM needed for the compiled model weights
RAM usage
~343 KB
RAM needed at runtime for activation buffers
Cos
1.0
Cosine similarity between on-target C model output and original TFLite output. Range (0, 1], best = 1. A value ≥ 0.99 indicates the deployed model closely matches the original. See important note below.
Acc
n.a.
Accuracy, only meaningful for classification with real data and ground-truth labels; otherwise shown as
n.a..L2r
0.07
L2 relative error between C model and original model. Lower is better. For float32 models, a value < 0.01 indicates close matching. For quantized INT8 models deployed on the Neural-ART NPU, larger values are typical due to quantization error — use
cosas complementary indicators rather than applying a fixed threshold.Nse
1.0
Nash-Sutcliffe efficiency. Best = 1, range = (-inf, 1]
Rmse / Mae
0.00
Root Mean Squared Error and Mean Absolute Error.
Important
During “on-target validation”, the outputs of the two following elements are compared to obtain the X-cross metrics (cosine similarity, L2R):
Model
Runs on
Runs using
1
Original TFLite model
Host (local PC)
TFLite runtime
2
Optimized C model
STM32N6570-DK Neural ART NPU
ST runtime
X-cross metrics compare the on-target C model against the original TFLite model on the host.They measure numerical fidelity of the conversion, not real-world accuracy.With random input data, both metrics can appear near-perfect regardless of model quality.Use a real, preprocessed dataset to get meaningful accuracy figures.
Model structure visualization 
Click the “ Visualize models ” button under the report to see a side-by-side graph of the model before and after optimization.
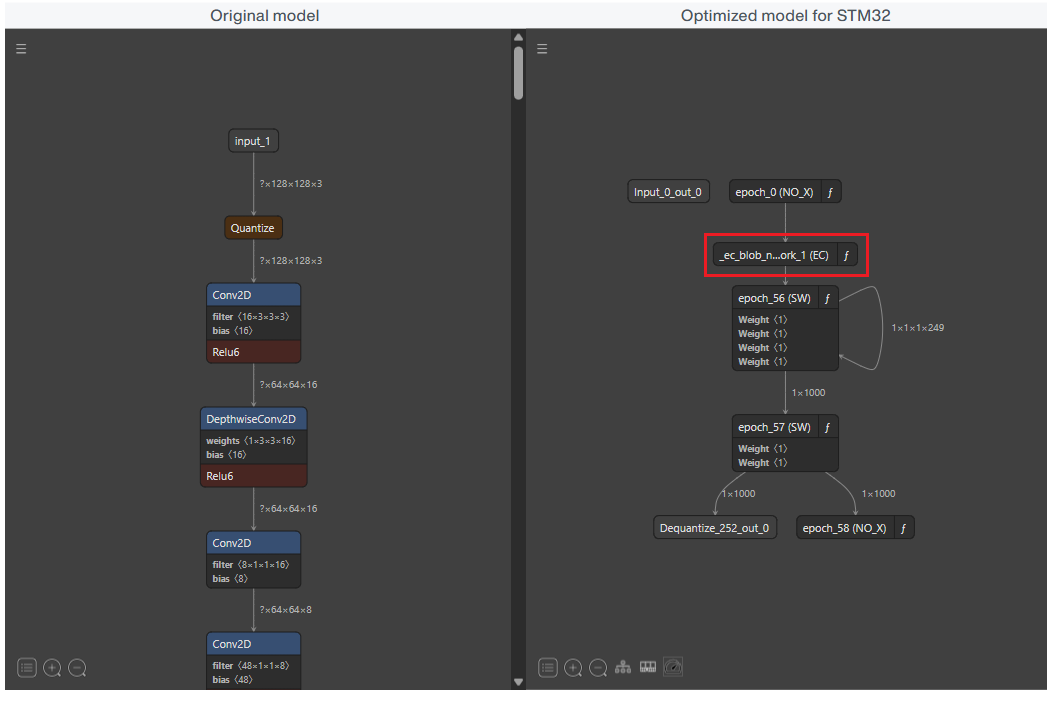
Left — original model: the full MobileNetV2 layer graph from the TFLite file.
Right — optimized model: the deployed representation. Most layers are fused into an EC blob — a single hardware-mapped block that the Epoch Controller executes directly on the NPU from a pre-compiled command stream. Two additional layers remain outside the blob and run as SW epochs on the Cortex-M55.
Warning
“Epoch” in this context ≠ training epoch.
In the ST Neural-ART execution scheme, an epoch is an elementary group of layers scheduled and executed together as a single unit:
HW epoch — mapped to the NPU and executed in hardware.
SW epoch — falls back to the Cortex-M55 CPU.
See Epoch definition for details.
When the Epoch Controller is disabled (via “Profile options”, under “Target” on the Run settings panel, see this section), the packed EC blob is replaced by individually listed layers, reflecting that each layer is dispatched separately without the command stream.
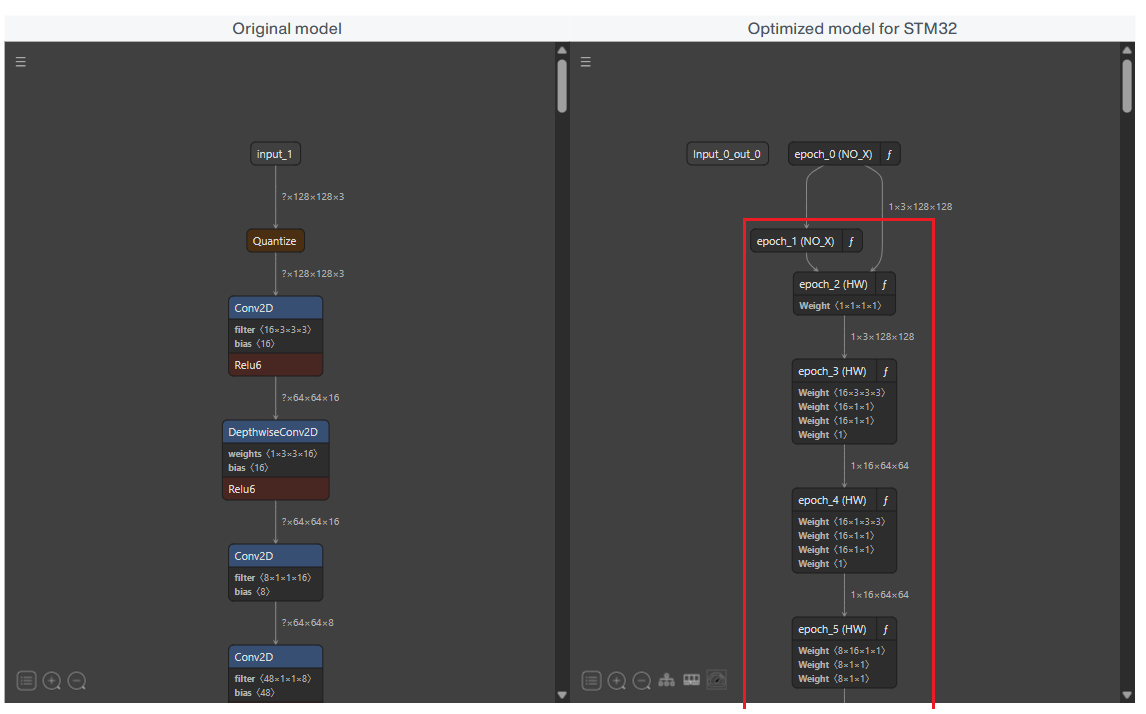
In our example, the overhead introduced by disabling the Epoch Controller results in an additional latency during each model inference:
Configuration
Inference time
Difference
Epoch Controller enabled
5.84 ms
— (baseline)
Epoch Controller disabled
7.94 ms
+2.1 ms (+26%)
Generate code 
After a successful run, the “Run” button is replaced with Generate Code, which exposes the following options:
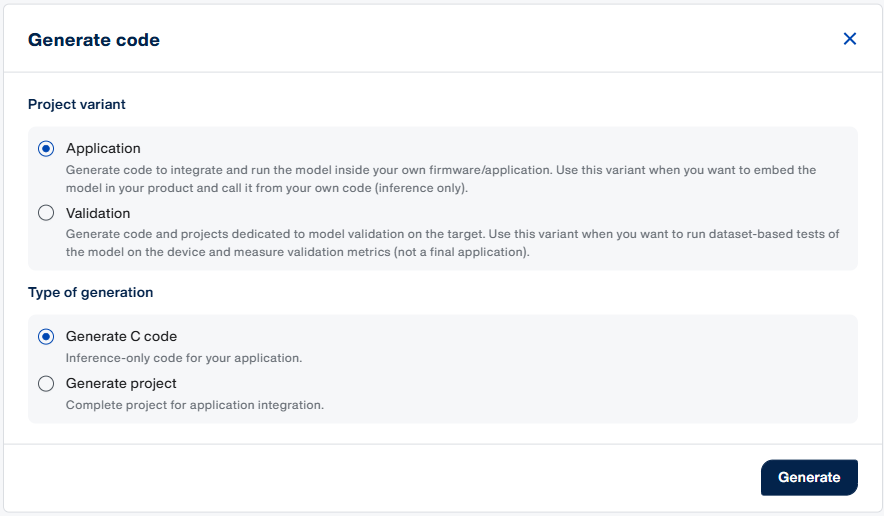
Here is a summary of the options and their use cases:
Setting
Option
Use when…
You get
Project variant
Application
Deploying model in own firmware
Inference-ready code
Validation
Testing model via ST Edge AI Core CLI (on-target validation)
Validation firmware
Type of generation
Generate C Code
Integrating into an existing project
C model files only
Generate Project
Starting from a working template
Full IDE project
Note
Using the Validation project variant is outside of the scope of this tutorial.For more information, see: On-target validation with ST Edge AI Core.
Generating model C-code 
- Click the “Generate Code” and choose:
Project variant: Application
Type of generation: Generate C Code
Note
This code generation is equivalent to the command
stedgeai --generatein the ST Edge AI Core CLI, and produces the generated C code files in theai_generated_networkfolder, see below.Click “Download your C model” and open the
.ziparchive downloaded:<project_name>-run-#-model-network-ApplicationTemplate-code.zip │ ├───AI │ └───App │ app_config.h │ app_x-cube-ai.c │ app_x-cube-ai.h │ bsp_ai.h │ network_weights.c │ network_weights.h │ npu_cache.c │ npu_cache.h │ npu_init.c │ npu_init.h │ user_init.c │ user_init.h │ ├───ai_generated_network │ mobilenetv2_a035_128_int8_OE_3_3_1.onnx │ mobilenetv2_a035_128_int8_OE_3_3_1_Q.json │ network.c │ network.h │ network_atonbuf.xSPI2.c │ network_generate_report.txt │ network_mobilenetv2_a035_128_int8_c_info_generate.json │ stai_network.c │ stai_network.h │ └───Middlewares └───ST └───AI ├───Inc ├───Lib ├───Misc │ ├───Inc │ └───Src └───NpuThe generated model code (
ai_generated_networkfolder) contains:
network.c/.h: model-specific optimized C code. Think of it as the low-level implementation of the neural network.
stai_network.c/.h: STAI client API wrapper for this model. This is the layer exposing functions such asstai_network_init(),stai_network_set_inputs(),stai_network_run(), andstai_network_deinit().
network_generate_report.txt: full generation report
network_c_info.json: machine-readable generation summary, useful for scripts and faster validation with--val-json.
mobilenetv2_a035_128_int8_OE_3_3_1.onnxandmobilenetv2_a035_128_int8_OE_3_3_1_Q.json: intermediate files used as input to the ST Neural-ART compiler
network_atonbuf.xSPI2.raw: raw memory initializer for the data the NPU expects in XSPI2 memory, mainly weights and parameters. It is programmed to memory separately from the C firmware.Note
Integrating the generated files into your application is outside the scope of this tutorial.For more information, see: How to deploy an AI model on STM32N6.
Generating project code 
- Click the “Generate Code” again and choose:
Project variant: Application
Type of generation: Generate project
Note
This project generation involves both ST Edge AI Core for model code generation, and STM32CubeMX for project scaffolding and MCU/NPU configuration.
When generation completes, click “Open Project in Explorer”:
C:\Users\<username>\.stm32cubeaistudio\workspace\<project_name>
├───.ai
│   ├───generate
│   │   └───backup
│   ├───run
│   │   ├───generate-1
│   │   ├───generate-2
│   │   ├───run-1
│   │   ├───run-2
│   │   └───run-3
│   ├───st_ai_output
│   └───st_ai_ws
├───Appli
│   ├───AI
│   │   └───App
│   └───Core
│       ├───Inc
│       └───Src
├───Drivers
│   ├───BSP
│   ├───CMSIS
│   └───STM32N6xx_HAL_Driver
├───FSBL
├───Middlewares
├───Secure_nsclib
└───STM32CubeIDE
    ├───Appli
    │   ├───Application
    │   │   └───User
    │   │       ├───Core
    │   │       └───Startup
    │   └───Drivers
    │       ├───CMSIS
    │       └───STM32N6xx_HAL_Driver
    ├───Drivers
    │   └───STM32N6xx_HAL_Driver
    └───FSBL
        ├───Application
        │   └───User
        │       ├───Core
        │       └───Startup
        ├───Drivers
        │   ├───CMSIS
        │   └───STM32N6xx_HAL_Driver
        └───Middlewares
Open the
STM32CubeIDEfolder, and double-click the.projectfile to open it in STM32CubeIDE.For STM32N6 targets, the workspace contains two projects:
<project_name>_Appli(the application) and<project_name>_FSBL(the first-stage bootloader). Both must be present for the project to build and run correctly.Inspect the template application code, especially in the
Appli/AI/Appfolder, and adapt it to your needs:C:\Users\<username>\.stm32cubeaistudio\workspace\<project_name>\Appli ├───AI │ └───App │ app_config.h │ app_x-cube-ai.c │ app_x-cube-ai.h │ bsp_ai.h │ network.c │ network.h │ network_atonbuf.xSPI2.c │ network_weights.c │ network_weights.h │ npu_cache.c │ npu_cache.h │ npu_init.c │ npu_init.h │ stai_network.c │ stai_network.h │ user_init.c │ user_init.h │ └───Core ├───Inc │ main.h │ partition_stm32n657xx.h │ stm32n6xx_hal_conf.h │ stm32n6xx_it.h │ └───Src main.c secure_nsc.c stm32n6xx_hal_msp.c stm32n6xx_it.c system_stm32n6xx_s.c
Next steps 
CLI-based validation workflows — batch validation, scripted non-regression pipelines → How to Validate a Neural Network on STM32
Python-based local inference (AI Runner) — validate a model locally without a board → How to use the AiRunner package
Build a full STM32N6 application — integrate the model into a complete project → How to deploy your AI model on STM32N6
Full CLI and options reference → ST Edge AI Core documentation