
 STM32Cube for Agentic AI

Choose your installation
STM32Cube for Agentic AI is modular. Install context bundles once on the machine, then deploy the contexts and services needed by each project. See STM32Cube Agentic Contexts to compare their capabilities.
Choose Typical to deploy all contexts compatible with your selected target. Choose Custom to select installed contexts and their services. Both routes support all six native editor-and-agent combinations. This page helps choose a route. Follow the installation guide for prerequisites and commands.
Installation decisions
Select the editor and agent, then choose a route. The target determines which contexts are available. The route determines whether you deploy all compatible contexts or choose them individually.
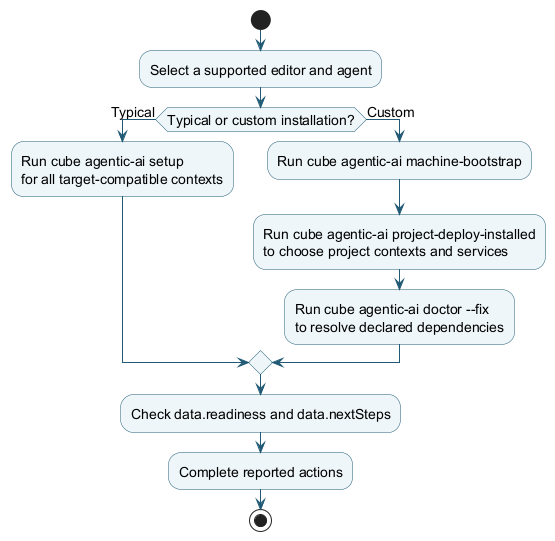
Choose a target and installation route
Select editor and agent
Choose one of the supported editor-and-agent combinations in Supported IDEs and AI coding agents. The installer does not install the editor or the AI agent. Build and DAP Debug contexts require the VS Code IDE target.
Typical installation
Use setup for a project not yet deployed by this installer. It installs and
deploys all contexts compatible with the selected target. Use the custom route
to choose individual contexts or services.
For terminal steps, see the
typical manual installation.
For an agent-led prompt, see the
typical agent installation.
The Embedded Software Context requires Python 3.10 or later. Select the Python
option during typical setup. The recommended isolated choice is venv. See
the Embedded Software Context guide for more
information. The
Embedded Software Context Python troubleshooting FAQ
covers detection, repair, and environment maintenance.
For target-specific extension and profile behavior, follow the installation guide. Avoid choosing a profile here without first confirming which editor target you selected.
Custom installation
Use the custom route when you need to choose contexts and services separately. It installs contexts on the machine, then deploys selected items to the project and checks declared dependencies. For terminal steps, see the custom manual installation. For an agent-led prompt, see the custom agent installation. Do not omit dependency repair after deployment.
For profile-specific extension repair, see the VS Code-only instructions in the installation guide.
Check installation readiness
After either route, check data.readiness and data.nextSteps. A
successful deployment is not proof that every dependency is ready. Complete
manual prerequisites and rerun doctor when needed. For the shared finish
checklist and repair commands, see the
installation guide.
Use project-add or project-remove rather than setup to change an
already deployed project. The
installer user manual
covers command details and maintenance.