
Menu bar and left bar 
Menu bar overview 
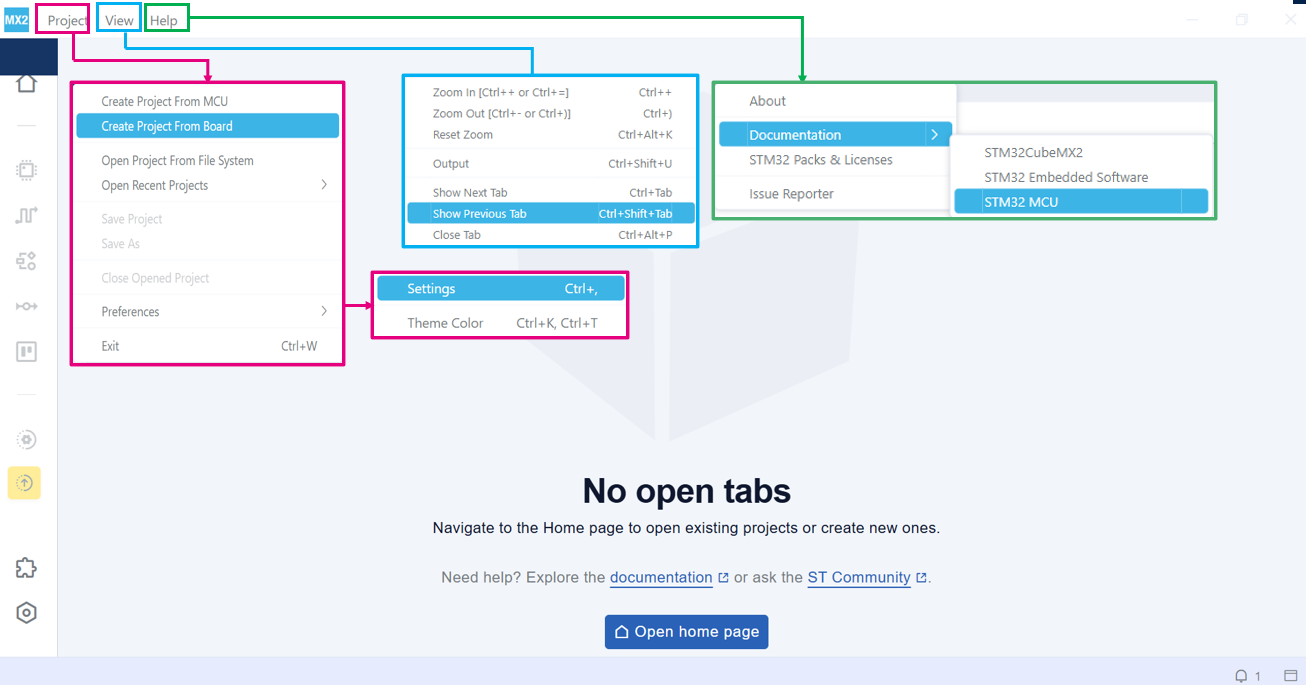
The menu bar in STM32CubeMX2 is organized into three categories: Project, View, and Help. Each category contains options and submenus that facilitate different functionalities within the application.
Project menu: The Project menu provides quick access to features available on the Home page. It focuses on project creation, management, and preferences. The following options are available:
Create Project From MCU: Start a new project using a specific MCU.
Create Project From Board: Start a new project based on a selected board.
Open Project From File System: Open an existing project from the file system.
Open Recent Projects: Access recently opened projects.
Save Project: Store changes to the current file.
Save As: Save a new copy with a different name or location.
Close Opened Project: Close the active project.
Preferences: Open the preferences settings for customization.
Settings: Open the settings dialog (shortcut: Ctrl and the comma key (Ctrl + ‘,’)).
Theme Color: Adjust the application theme color (shortcut: Ctrl+K, Ctrl+T).
Exit: Close the application (shortcut: Ctrl+W).
View menu: The view menu is designed to manage various views and settings within the application. It includes:
Zoom In: Increases the view size to magnify on screen content (shortcut: CTRL ++ or CTRL + =).
Zoom Out: Decreases the view size to show more content at once (shortcut: CTRL + - or CTRL +) ).
Reset Zoom: Restores the view to the default 100% zoom level (shortcut: CTRL + ALT + K).
Output: Display output logs (shortcut: Ctrl+Shift+U).
Show Next Tab: Switches to the next tab in the tab bar (shortcut: CTRL + Tab ).
Show Previous Tab: Switches to the previous tab in the tab bar. (shortcut: CTRL + Shift + Tab).
Close Tab: Closes the currently active tab (shortcut: CTRL + ALT + P).
Help menu: The help menu provides access to documentation and support options. It includes:
About: Display information about the application.
Documentation: Open the application related documentation.
STM32CubeMX2 : MX2 online documentation.
STM32 Embedded Software : Embedded SW top level Page.
STM32 MCU: Online resources related to STM32 microcontrollers.
STM32 Packs & Licences: STM32Cube MCU software packages information (HAL/LL drivers, middleware, BSPs, examples) and their associated license terms and conditions.
Issue reporter: Export the cube environment as a zip file to facilitate issue reporting.
Menu bar overview 
Report issue 
To report an issue with STM32CubeMX2, in the Help menu, select Issue Reporter, and follow the prompts.
Left bar overview 
The left sidebar contains quick access icons for frequently used features. The following table summarizes these icons:
|
Icon |
Description |
|---|---|

|
Home: Open the Home tab |

|
Project settings: Open the project settings tab for managing projects |

|
Pinout: Open the pinout view for configuring pin assignments |

|
Clock: Open the clock view for setting and configuring clocks |

|
Peripherals: Open the peripherals view for accessing peripheral settings |

|
Middleware & Utilities: Open the middleware & utilities view for listing available middleware and utilities. |

|
Parts: Open the parts view for listing available parts drivers |

|
Pack manager: Open the pack manager view to check, install, uninstall, and update software packs |

|
IDE project generation: Generate quickly an IDE project |

|
Settings: Open the settings view for accessing various application settings |
Note
The left bar displays only the Home, Pack manager, and Settings icons when no project is open.