
 STM32CubeProgrammer

Secure programming interface 
Introduction 
This window facilitates STM32CubeProgrammer CLI commands for secure programming:
RDP regression with password feature: available for STM32U5, STM32U3, STM32U0, STM32WBA5/6/2, and STM32C5 series.
SFI/SFIx feature: available for STM32H7, STM32U5, and STM32L5 series.
RDP regression with password 
Some STM32 products, such as those of the STM32U0, STM32U5, and STM32C5 series, offer the possibility to use an optional password-based RDP level regression, including RDP level 2. Detailed information about this hardware mechanism is available in reference manuals.
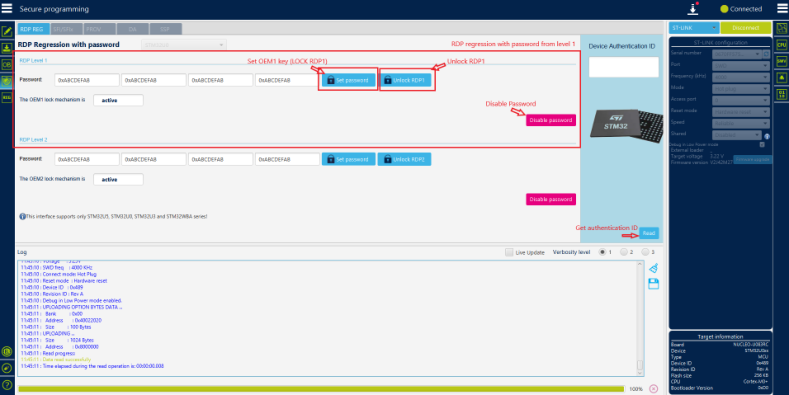
Fig. 36 RDP regression with password tab 
STM32U5 
RDP level 1: the OEM1 RDP lock mechanism is active when the OEM1 key is set. It blocks the regression from RDP level 1.
- To unlock the RDP from level 1 regression, the user must write the OEM1
password, press on
RDP regressionbutton and then perform the RDP regression fromOption Bytesinterface.
- To remove RDP regression with password from level 1, the user must press
on
Disable passwordbutton.
RDP level 2: provision OEM2KEY to authorize RDP level 2 to level 1 regression with the
Set passwordbutton.- To unlock the RDP from level 2 regression, the user must write the OEM2
password, press on
RDP regressionbutton, and then try to connect with STM32CubeProgrammer. If this key matches the OEM2KEY value, the RDP regression to level 1 is launched by hardware.
- To remove RDP regression with password from level 2, the user must press
on
Disable passwordbutton.
Device authentication ID: get device identification. Unless the JTAG port is deactivated, with OEM2LOCK = 0 and RDP level = 2, a 32-bit device specific quantity can always be read through the JTAG port. The OEM can use this 32-bit information to derive the expected OEM password keys to unlock the device.
STM32U0 
RDP level 1: the OEM1 RDP lock mechanism is active when the OEM1 key is set. It blocks the regression from RDP level 1.
- To unlock the RDP from level 1 regression, the user must connect in
hotplug mode on access port 1, write the OEM1 password, press on
RDP regressionbutton, and then perform the RDP regression fromOption Bytesinterface.
- To remove RDP regression with password from level 1, the user must press
on
Disable passwordbutton.
RDP level 2: provision OEM2KEY to authorize RDP level 2 to level 1 regression with the
Set passwordbutton.- To unlock the RDP from level 2 regression, write the OEM2 password, press
on
RDP regressionbutton, and then try to connect with STM32CubeProgrammer. If the key matches the OEM2KEY value, the RDP regression to level 1 is launched by hardware. In this use case, the connection is done withap = 1.
- To remove RDP regression with password from level 2, the user must press
on the
Disable passwordbutton.
Note
For more details, please refer to Annex 7, Usage of the
unlockrdp2
command.
STM32C5 
RDP level 2: provision OEM2KEY to authorize regression from RDP level 2 or level 2 with Boundary Scan to level 0 using
Set passwordbutton.- To perform the regression from RDP level 2, write the OEM2 password, press
RDP regressionbutton, and then connect with STM32CubeProgrammer. If the key matches the OEM2KEY value stored in the device, the RDP regression to level 0 is launched by hardware.
BSKEY management: RDP level 2 with Boundary Scan can transition to RDP level 2 using the BSKEY, a 32-bit password. The BSKEY must be set when in RDP level 0.
Note
A default value,
0xAAAAAAAA, is preloaded during manufacturing.
To transition RDP level 2 with Boundary Scan to RDP level 2, set the password then select the
transitionbutton, without connecting to the target.
SFI/SFIx 
SFI GUI 
Use STM32CubeProgrammer, version 2.11 or higher.
Access the SWD or bootloader interface.
Open Secure Programming interface, then SFI tab, as shown in the SFI/SFIx tab figure below.
- Select the license source, from a license file or directly from your
connected HSM.
- Select the SFI file. Once selected, the SFI parsed info is displayed, as
shown in the SFI parsed info figure below
Select the RSSe file, if needed.
Start SFI sequence, as shown in the Steps for SFI programming figure below.
Note
To open TPC to generate the SFI file, press on the TPC logo.
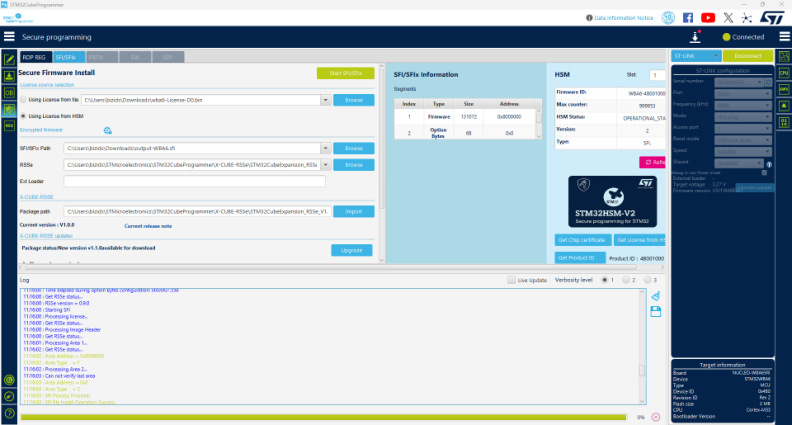
Fig. 37 SFI/SFIx tab 
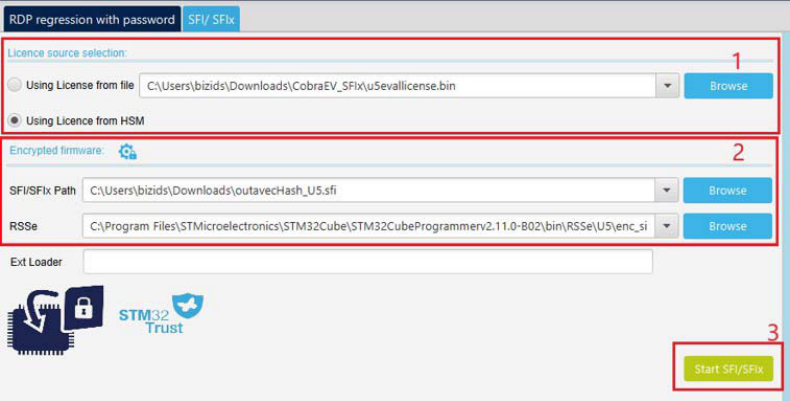
Fig. 38 Steps for SFI programming 
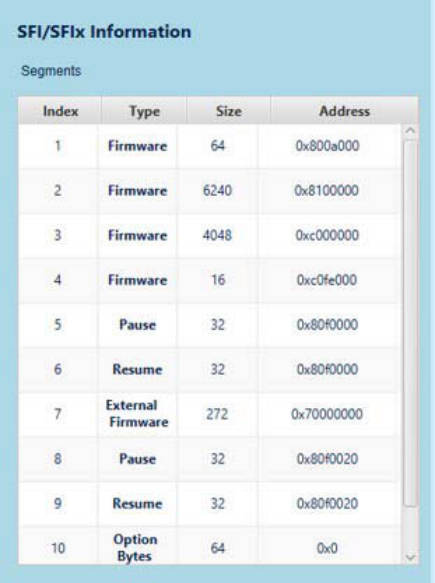
Fig. 39 SFI parsed info 
SFIx GUI 
To perform a successful SFIx operation using this graphical interface, perform the same steps described in SFI GUI, with two minor modifications:
Select an SFIx, not an SFI.
- Select the external loader via External loaders window. Once done, the name
is displayed automatically in the text field below, as shown in the following figure.
Then you can start the SFIx sequence.

Fig. 40 Display external loader name 
HSM related info 
This panel contains all the needed information in the SFI process. It allows the user to read the available HSM information when a card is detected, get the license from HSM, get the chip certificate, and read the product ID.
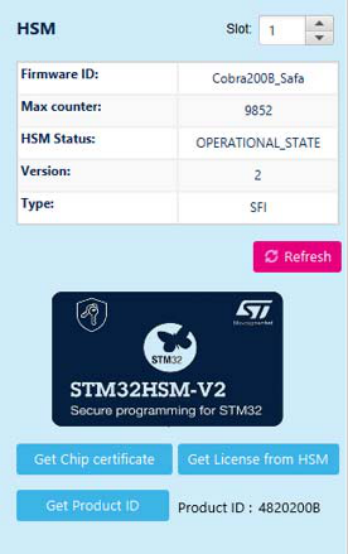
Fig. 41 HSM-related info panel 
For more details refer to AN5054, Secure programming using STM32CubeProgrammer, available on www.st.com.
SFI/SFIx GUI for devices supporting Secure Manager 
The tool displays additional fields, giving the option of passing a module to the SFI or SFIx and an external module to the SFIx:
Modules:.mcsvfile containing the list of internal modules.exModules:.ecsvfile containing the list of external modules.
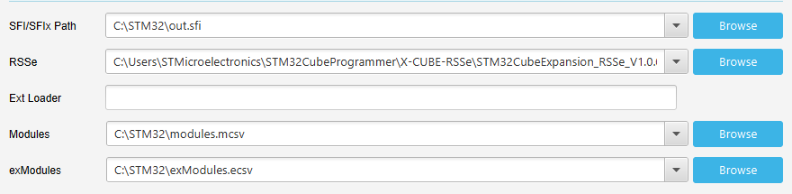
Fig. 42 SFI/SFIx modules for STM32H5 
X-CUBE-RSSe 
The X-CUBE-RSSe comes in zip format and can be directly imported. This package contains:
RSSe binaries: Root Security Services Extension needed to perform the SFI/Key Wrapping.
Personalization data: encrypted binaries to be programmed into HSM depending upon the used MCU.
Option bytes CSV: template for OB CSV files to be used for SFI file creation.
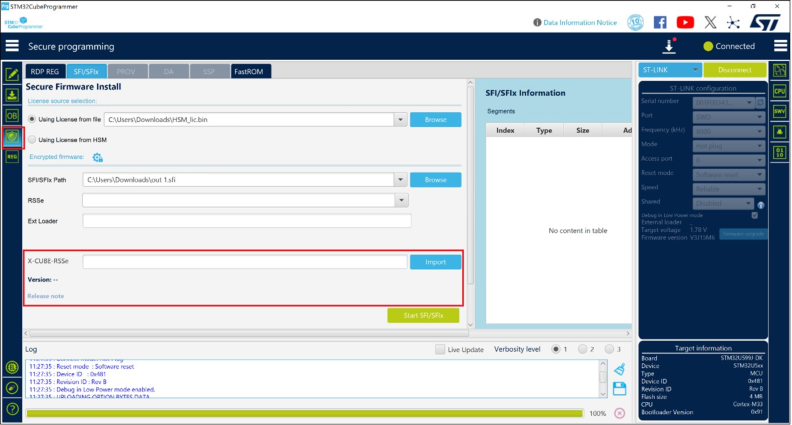
Fig. 43 X-CUBE-RSSe interface in the SFI/SFIx window 
The user can import this package from the SFI/SFIx window within the Secure Programming window. This window contains:
Imported package path: automatically populated after importing the package.
Package version: automatically filled after importing the package.
Release note link: the hyperlink is enabled after importing the package.
After successfully importing the package, a populated list of available RSSe binaries is automatically filled in its respective fields.
X-CUBE-RSSe and STM32MPUSSP-UTIL upgrade 
In the SFI/SFIx and SSP tab, the user can check for the latest version of the package available for download.
After accepting the software license, if the download and upgrade of the new version are successful, the package status is marked as up-to-date and the new RSSe files are automatically filled in their respective fields.
For users using proxy to connect to the web, proxy settings must be configured.
SSP 
STM32CubeProgrammer user interface exports several capabilities that can be used to execute the SSP flow.
To open the SSP window, connect an MPU device via DFU interface, click on security panel, and then choose the SSP tab. The window contains the graphical components needed to perform SSP operations.
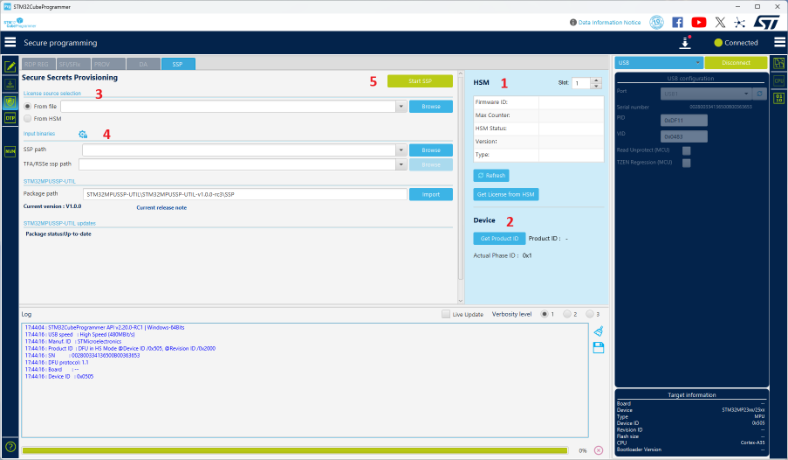
Fig. 44 SSP PRG user interface 
The UI is composed of five elements:
HSM section.
Device section.
Input license.
SSP input binaries.
Verify and Start SSP install.
HSM section 
This section allows the user to read HSM information when the smart card is detected in the slot selected by the user. With this tab it is also possible to get a license from HSM.
Press
Refresh
button to read and display the related information for the
plugged HSM.
Device section 
This part allows to get the product ID of the connected device, needed to choose the correct personalization package to be provisioned in the HSM card by the STM32Trusted Package Creator.
If the device is not in a configuration adequate to get the chip certificate,
it is mandatory to provide a
tfa-ssp
file in the
SSP


             inputs
section.
STM32CubeProgrammer will then set the device in the correct state.
The current phase ID is displayed to highlight the device configuration.
Input license 
The user must select the source of the license to be used in the SSP flow. Possible sources:
From file: to select a binary file already generated by the HSM.
From HSM: the SSP procedure extracts the license directly from the HSM.
SSP input binaries 
This part is needed to select the secure input files:
SSP file: an encrypted SSP image generated by STM32Trusted Package Creator.tfa-ssp: binary file with.binor.stm32extension.
To generate an SSP image, launch directly the SSP generation window of STM32Trusted Package Creator tool by clicking on the TPC icon.
Verify and Start SSP install 
When the user clicks on
Start


             SSP
button, STM32CubeProgrammer verifies all
mandatory inputs and starts the SSP procedure.
If the operation is successful, an informative popup is displayed, and the device is disconnected.
If an error occurs at any step, the operation stops the flow and displays an error.
Note
At the end of the flow STM32CubeProgrammer does not make any verification
step for the OTP fused words. If the mentioned
tfa-ssp
is not the
adequate one, the SSP flow fails.
The STM32MPUSSP-UTIL comes in zip format and can be directly imported in the STM32TrustedPackageCreator. This package contains:
RSSe SSP binaries: Root Security Services Extension needed to perform Secure Secret Provisioning.
Personalization data: encrypted binaries to be programmed into HSM depending on used MPU.
The user can import the STM32MPUSSP-UTIL package from the SSP window within the Secure Programming window. This window contains:
Package version: automatically filled after importing the package.
Imported package path: automatically populated after importing the package.
Release note link: the hyperlink is enabled after importing the package.
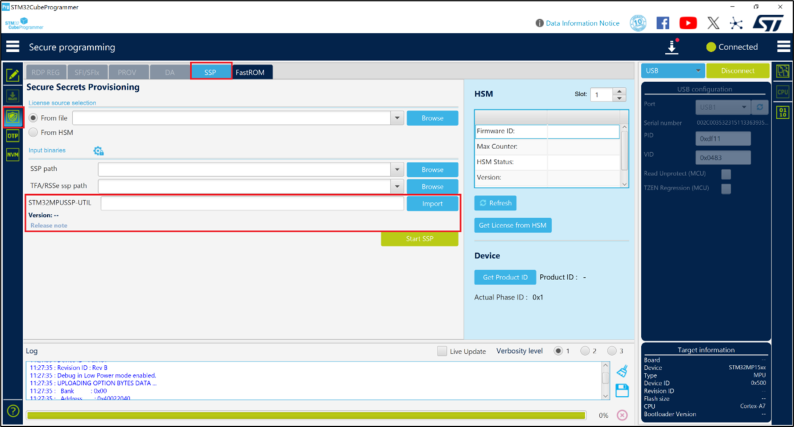
Fig. 45 STM32MPUSSP-UTIL interface in the SSP window 
OBKey provisioning 
This is a security feature that allows to program OBKey content. The file generation is managed by STM32 Trusted Package Creator. For more information, refer to UM2238.
There are two possible cases of OBK provisioning for debug authentication:
Provisioning with password: before launching it, set TZEN at
0xC3, disabled, and product state at0x17, provisioning.Provisioning with certificate: before launching it, set TZEN at
0xB4, enabled, and product state at0x17, provisioning.
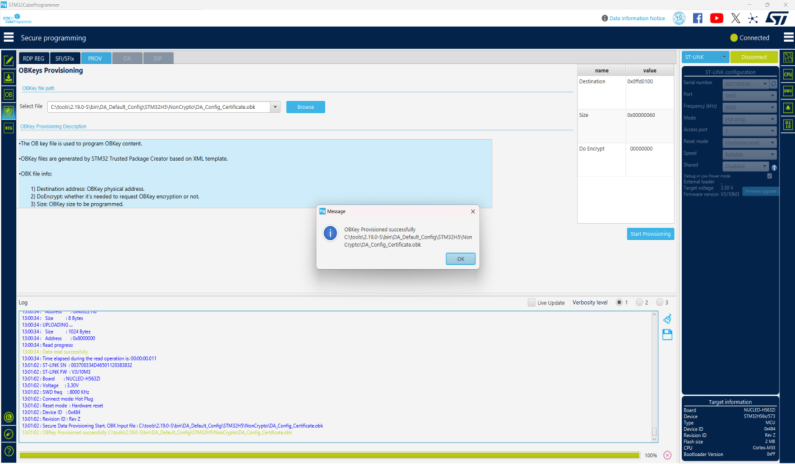
Fig. 46 OBKey provisioning 
OTP provisioning panel 
Debug authentication - Password provisioning 
For devices supporting debug authentication without Arm TrustZone, the
password hash,
hash256, is stored in OTP. This panel allows password
provisioning. To do it, enter a password value, size must be between 4 and 16
bytes, and a password path.
Once the OTP is written, the corresponding block is locked. The password value
is used to calculate the hash to store in OTP. The password path is the
location where to save the
password.bin
file, needed to open the device in
a Debug Authentication sequence.
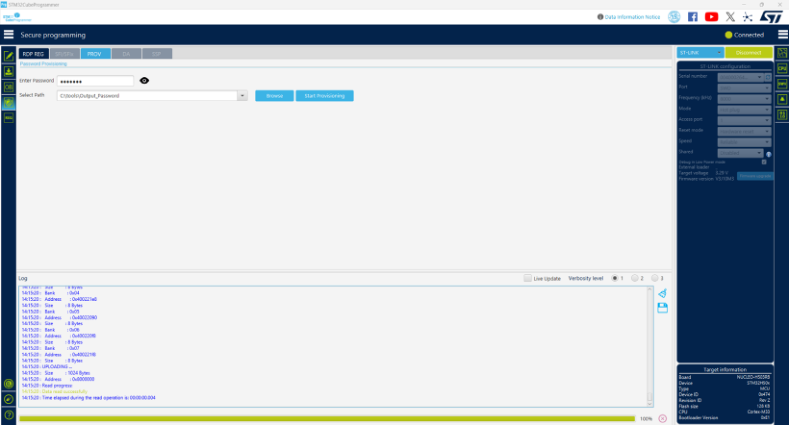
Fig. 47 Password provisioning 
Note
For more information see Getting started with debug authentication (DA) for STM32 MCUs.
Password provisioning can be performed only once for each device, as the password is stored in OTP.
Public key provisioning for STM32WB0x/STM32WL3x devices 
This panel is used to provision authentication public key used in secure boot scenario. The input key is generated by STM32TrustedPackage Creator. The associated private key is used to sign the firmware stored in the flash memory. For more information refer to AN5471, The BlueNRG-LP, BlueNRG-LPS UART bootloader protocol, available on www.st.com.
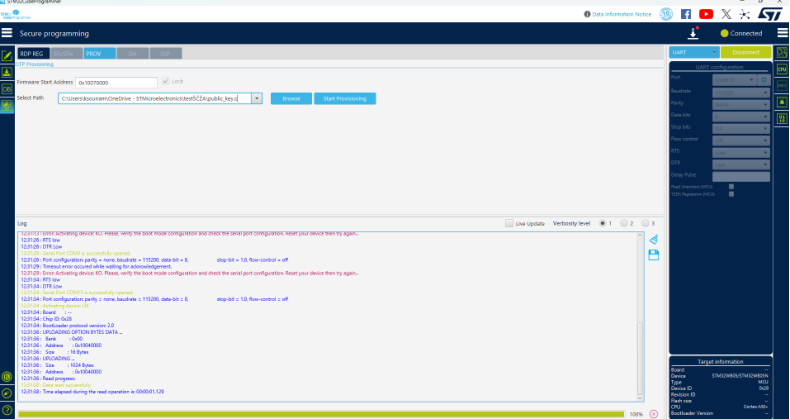
Fig. 48 Public key provisioning for STM32WB0x/STM32WL3x devices 
Debug authentication 
This feature allows regression or open debug when the target is provisioned. The user must provide the needed credentials by following these steps:
Discovery: this operation displays the info about the target.
To make sure that provisioning is correctly performed,
Integrity statusfield must be checked: it must indicate0xEAEAEAEAas value, displayed in the log. This operation cannot be launched while the target is connected.- Credentials input: beside discovery related data, Debug authentication
panel displays at this step a form including the necessary inputs:
- Target provisioned with password: the panel includes only the password
file path.
- Target provisioned with certificate: the panel includes key and
certificate path inputs. In this case, the user can select the possible permission or actions, and multiple choices can be checked for some cases.
- For devices supporting debug authentication with TrustZone, the user can
close the debug after opening it, instead of powering off or on the target. To close debug, use the
Close Debugbutton included in Debug Authentication panel.
Note
For STM32H503, only a full regression with password is available.
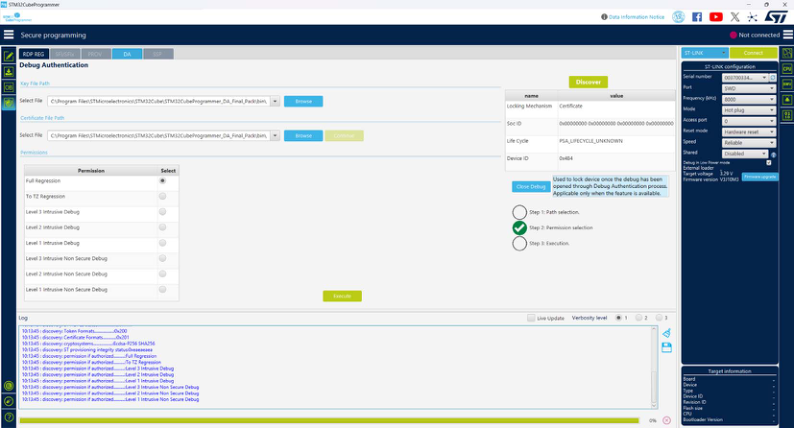
Fig. 49 Debug authentication with certificate 